ArcGIS Enterprise on AWS
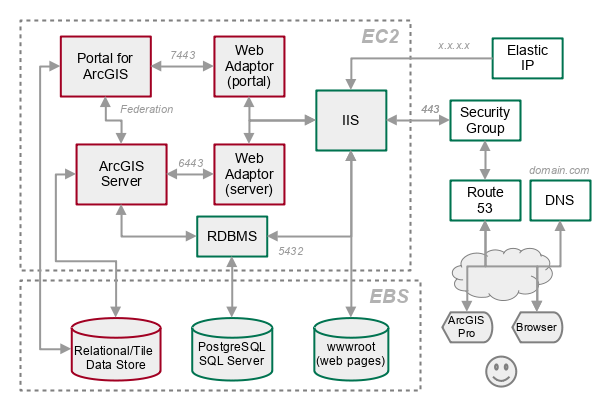
This tutorial covers the creation of an ArcGIS Enterprise 10.9.1 EC2 instance on Windows Server 2019 using a machine image from Amazon Web Services.
License Files
ArcGIS Enterprise License File
You will need a license (.prvc) file to authorize ArcGIS Enterprise.
In commercial settings, you can get this file from your My Esri site.
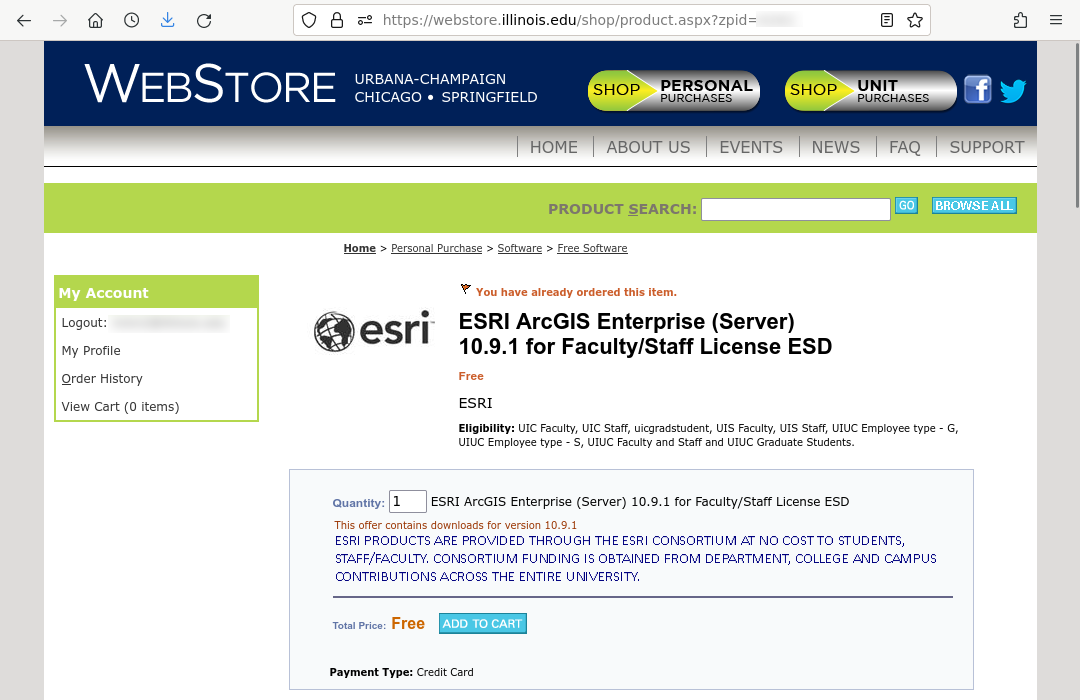
In educational settings, you will probably get this file through your site administrator. At the University of Illinois, faculty licenses for ArcGIS Enterprise are part of the university site license, and can be ordered and downloaded through the U of I WebStore.
Portal License File
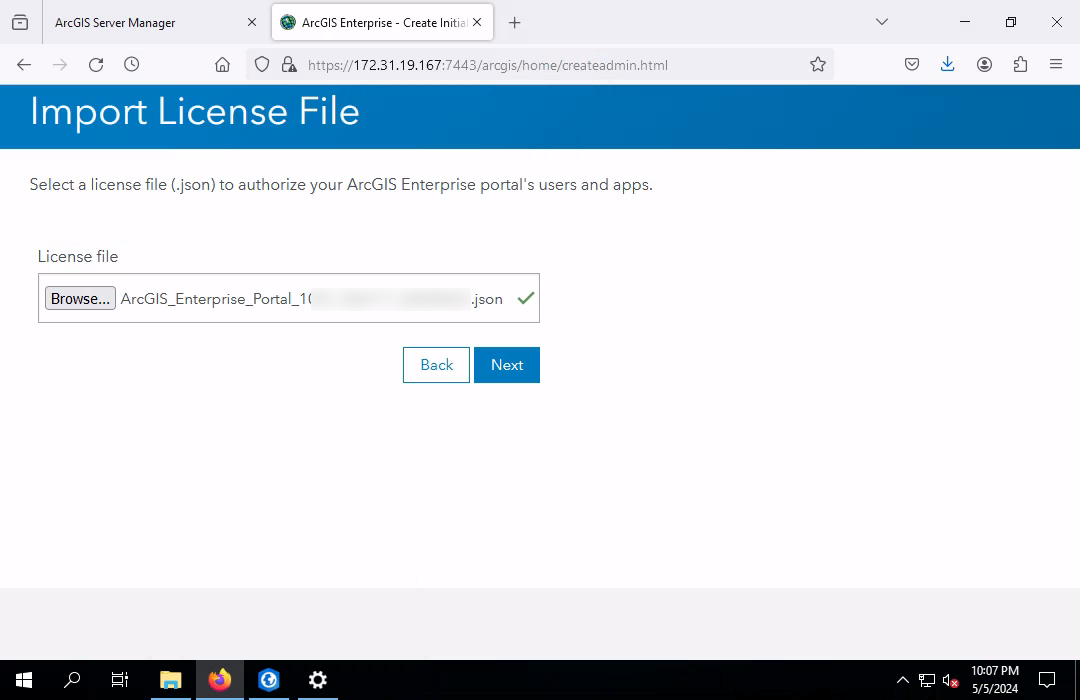
Portal for ArcGIS has a separate .json license file that you can also get from My Esri or your system administrator.
Launching the Instance
Decide on an Instance Type
Minimum system requirements for ArcGIS Enterprise are 8 GB RAM and 10 GB disk, although you will undoubtedly wish to exceed that to get any meaningful level of performance.
M instances are fixed performance, while T images are burstable, with a minimum baseline processor availablity with the ability to burst above the baseline.
For this installation I chose a m5a.xlarge instance.
- 4 vCPU
- 16.0 GB memory
- On demand $0.3550/hr
- 16 week semester * 7 days/week * 24 hrs/day * 0.3560/hr = $956 / semester
You will also need to choose a region. Minimizing distance to your target audience (if possible) will improve performance. I chose US East (Ohio).
AWS Subscription
Subscriptions for ArcGIS Enterprise Amazon Machine Images (AMI) are available AWS Marketplace. While these images have purchase price, you will need an ArcGIS Enterprise license (see above) and you will pay for the the EC2 instance when it is running.
I chose the version 10.9.1, which was the most recent version available at the time of this writing (April 2024).

Security Group
Configure the new security group for the ports needed to access and administer the server.
Servers are prime targets for threat actors, so, if possible, you will want to limit access to a subnetwork for your users. This example uses one of the University of Illinois subnetworks (130.126.0.0/16).

Elastic IP
To set up a security certificate, you will need a fixed IP address, which you can allocate with AWS Elastic IP.

Configuring the Server
You will need to configure the server and web services before setting up ArcGIS Enterprise.
Connect to Your Instance

Change the Administrator Password
Change the unmemorable and insecure default password.

Install Browser
The ArcGIS Enterprise 10.9.1 image comes only with Internet Exploder and you will likely want to install another browser like Edge or Firefox.

Enable Web Server
Enable the Internet Information Server (IIS).

Domain Name
Although you can use the public DNS based on the AMI ID, if you want to have secure access with a security certificate, you will need to attach a domain name to the instance with Route 53.

Extensionless Files
To get a security certificate in the next step, you will need to configure IIS to accept the MIME type "." for extensionless files.

Security Certificate
Although the AWS Certificate Manager issues security certificates, they do not allow access to the private keys, so you can't install them on an EC2 Windows Server.
However you can get a free security certificate from Let's Encrypt.

Security Patches
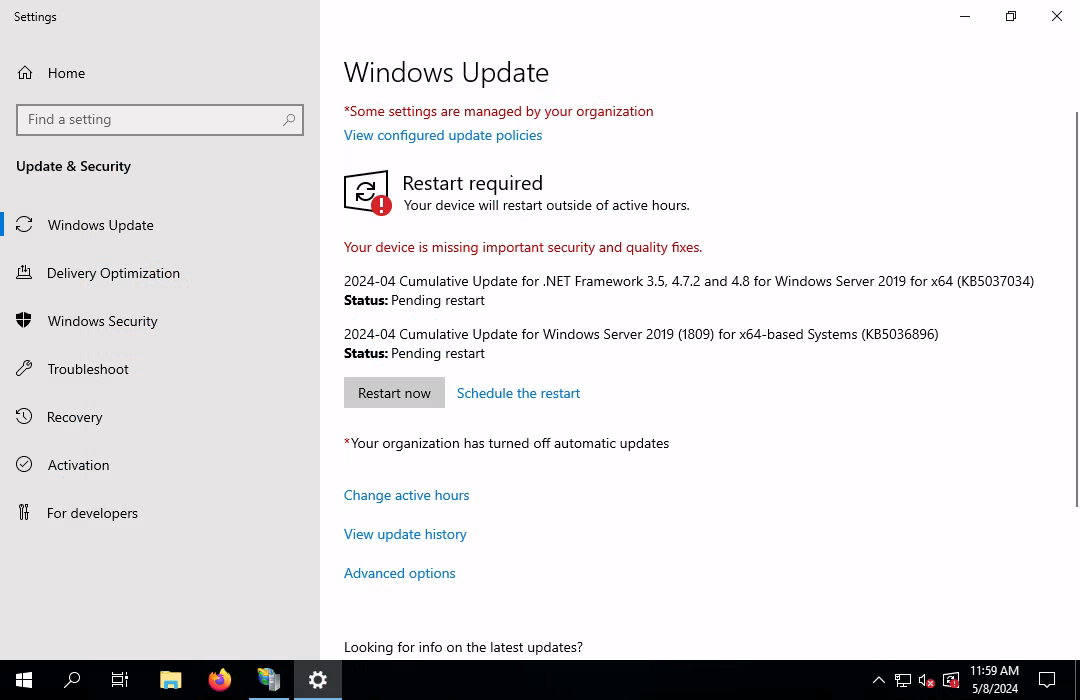
The version of Microsoft Server in the image should be updated with the most recent patches as quickly as possible after configuration to optimize system security. The version in the image will be old and servers are prime targets for hacking bots.
Configure ArcGIS Enterprise
Authorize ArcGIS Enterprise

Start ArcGIS Enterprise

Configure ArcGIS Enterprise

Export a Certificate File
Export a copy of your security certificate from your Microsoft Server into a .pfx file for import into both ArcGIS Enterprise and Portal for ArcGIS.

ArcGIS Enterprise Secure Certificate
Import the security certificate from your server to enable ArcGIS Enterprise HTTPS. This eliminates error messages for certificate mismatches with the self-signed certificates.

Configure the Data Store
The ArcGIS Enterprise data store is where portal data and data for services is stored by default.

ArcGIS Pro and ArcGIS Enterprise
Although you will almost certainly prefer to access services through Portal for ArcGIS as described below, you can use ArcGIS Pro with feature and tile services directly on the server.
Test the Map Service
ArcGIS Server comes with a sample map service to test connectivity.

Server Connection

Publish a Map Service
Although it is generally easier to publish feature services via Portal, you can publish services to your server through the Catalog Pane.
- Create and symbolize a map. In this case we use Export Features to copy data from an existing Minn 2019 World Energy Indicators ArcGIS Online feature service into the project geodatabase.
- Remove the base map since those come from a separate tile service and cannot be republished.
- Right click on the server in the Catalog Pane and select Publish, Map Service.
- Select the map you wish to publish.
- Analyze to confirm there are no errors.
- If you get the Error 00374 Unique IDs are not assigned error, click on the ellipsis (...) beside the error and select Auto-Assign IDs Sequentially.
- Publish the service. This may take a minute or two depending on the amount of data.
- Confirm availability of the service in the Server Manager
- Create a new map and verify that the feature service can be added as a new layer.
Portal for ArcGIS
Portal for ArcGIS is a service that allows you to access and manage data store(s) and ArcGIS Enterprise services. Portal is the same interface used by ArcGIS Online, except it runs on your server rather than one of ESRI's cloud servers.
Web Adaptor Reinstall
ArcGIS Enterprise uses a service called ArcGIS Web Adaptor to reroute server requests on the standard https port (443) to the server (6443).
Go to the Web Adaptor configuration page (https://localhost/server/webadaptor) and choose the GIS server option. If it fails with the Server Error in '/' Application error, you will need to uninstall and reinstall Web Adaptor

Server Web Adaptor Configuration
Configure the first Web Adaptor for the server to route port 443 to server port 6443.

Create Portal
Portal for ArcGIS is installed as part of the AWS image, so you should only need to authorize it.
You will first need to obtain a portal authorization file from >My Esri.

Portal Web Adaptor Configuration
You need to create a second installation of ArcGIS Web Adaptor that will reroute server requests on port 433 to port 7443 used by ArcGIS Portal.
Note that this is completely separate Web Adaptor from the Web Adaptor used to route server requests to port 6443. If you try to configure a single Web Adaptor twice, you can get errors when attempting to authenticate into different server and portal services:
To install a second Web Adaptor:

Portal Certificate
Import the certificate .pfx file exported above into Portal for ArcGIS. This will prevent this error message in ArcGIS Pro: The certificate you are viewing does not match the name of the site you are trying to view. A secure connection with this site cannot be verified. Would you like to proceed?

Federate The Server to Portal
Federation is the interconnection of servers to delegate security. Portal for ArcGIS can be federated with ArcGIS Enterprise so that server security can be managed conveniently through Portal's full-featured interface.

License Manager
If you want to be able to authorize ArcGIS Pro and other software through your Portal, you will need to install the License Manager.
You can get a License Manager installer .exe file from My ESRI.

Connectivity to the license manager can be inhibited by the layers of security and configuration.
Expose port 27000 in Windows Defender Firewall and, if needed, in the Security Group.

PostgreSQL Enterprise Database
The PostgreSQL relational database management system with PostGIS extensions can be used as a data store with ArcGIS Enterprise.
Install
Although the installed data store seems to run PostgreSQL processes, you need to install PostgreSQL to be able to set up a separate geodatabase.
Run the version 13.3 installer provided in Documents\ArcGIS 3rd Party\PostgreSQL_13.3 with the ArcGIS Enterprise installation files. Alternatively you can download and run the PostgreSQL installer.

PostGIS
After the PostgreSQL installer completes, the Stack Builder component installer will start.

pgAdmin
pgAdmin is the administrative console that comes with PostgreSQL.

If you do not see a database in the list, or if you get the [ "https://stackoverflow.com/questions/75510548/instance-server-at-0x2298c-is-not-persisted", Instance...is not persisted error when you try to create a new database, Delete the C:\Users%USER%\AppData\Roaming\pgadmin and C:\Users\%USER%\AppData\Local\pgadmin folders, restart pgadmin, and perform the configuration steps above again.
Remote Access
If you need remote access to the database from another machine, you will first need to configure the database to receive connections.
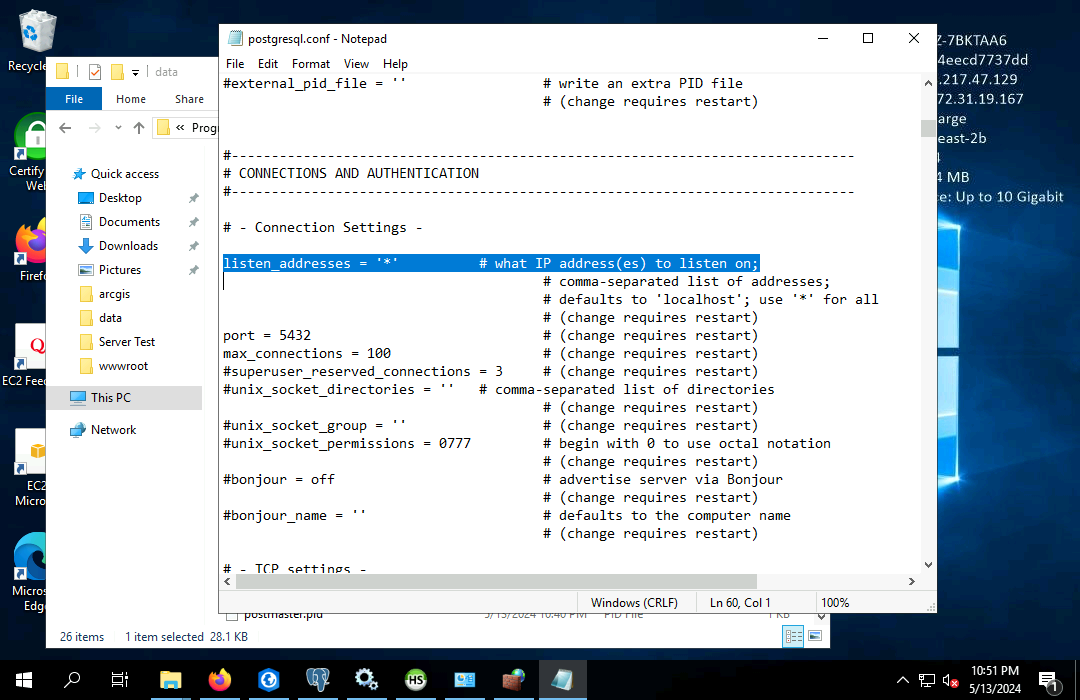
Open C:\Program Files\PostgreSQL\13\data\postgresql.conf and replace listen_addresses = 'localhost' with listen_addresses = '*'
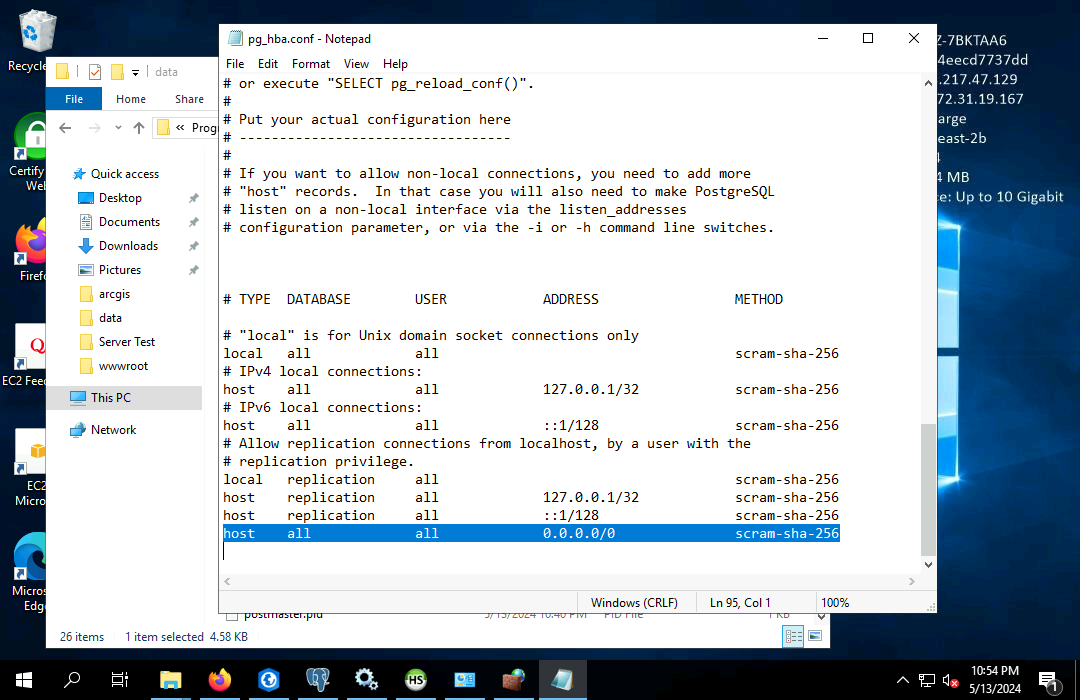
Open C:\Program Files\PostgreSQL\13\data\pg_hba.conf and add the following line to accept all connections.
host all all 0.0.0.0/32 scram-sha-256

Register the Database with ArcGIS Enterprise
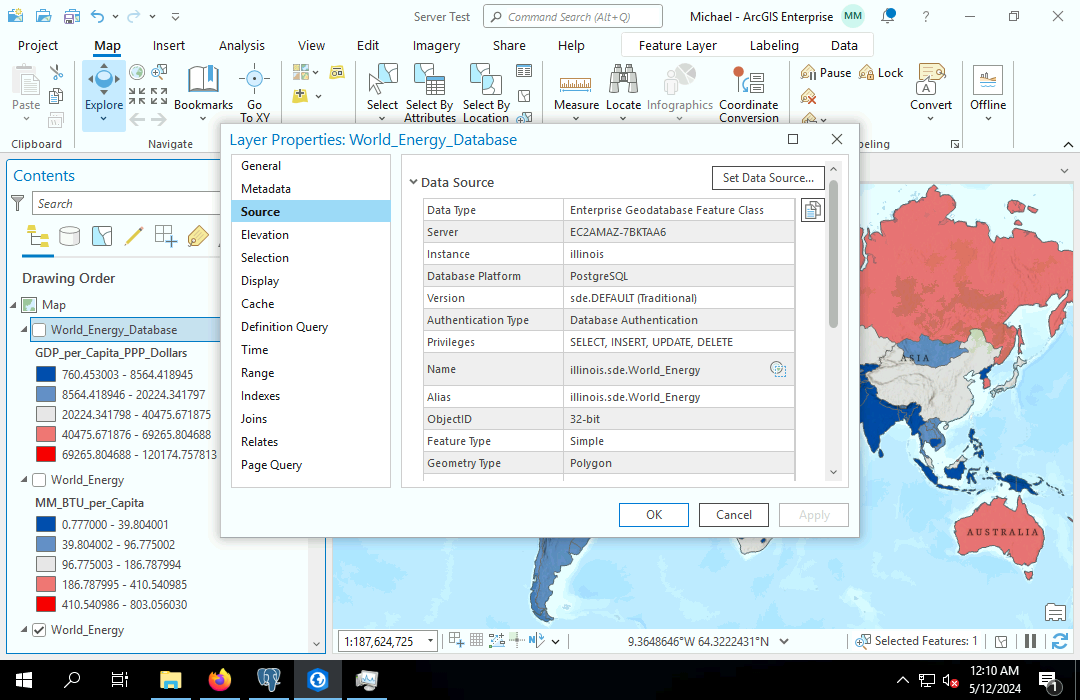
If you want web layers to access data in an enterprise geodatabase, you need to register the PostgreSQL database with ArcGIS Enterprise.
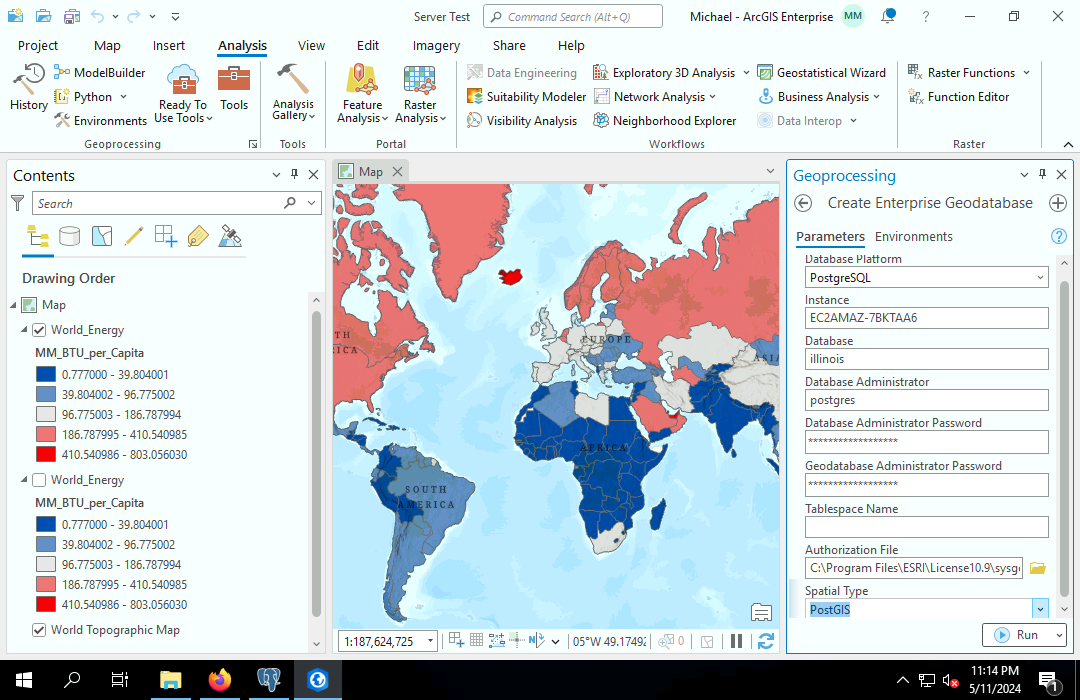
In ArcGIS Pro, run the Create Enterprise Geodatabase tool.
- Database Platform: PostgreSQL
- Instance: The server name
- Database: Provide a meaningful name (illinois)
- Database Administrator: The superuser (postgres)
- Database Administrator Password: The password
- Geodatabase Administrator Password: The password
- Authorization file: C:\Program Files\ESRI\License10.9\sysgen\keycodes
- Spatial Type: PostGIS
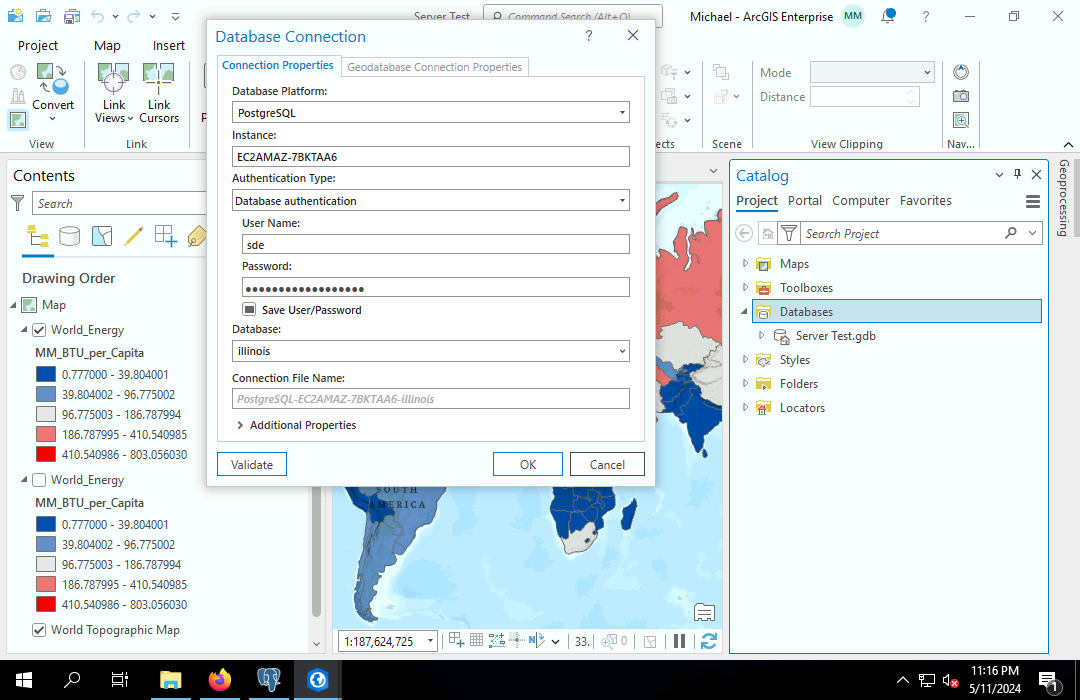
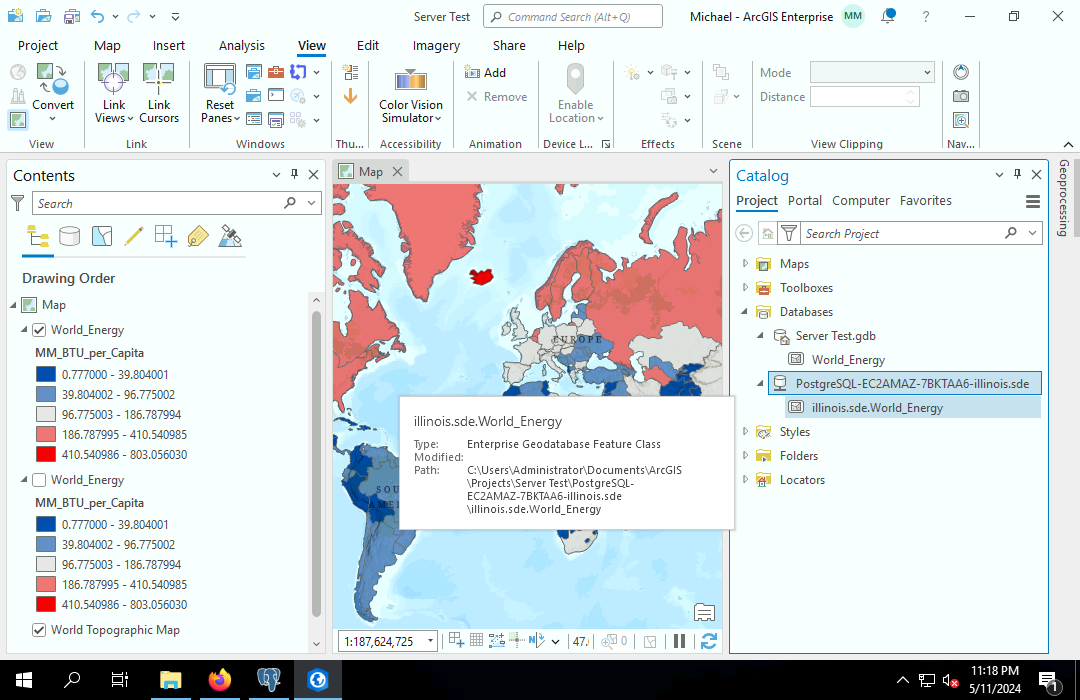
In the ArcGIS Pro Catalog pane, right click on Databases and select New Database Connection.
- Database Platform: PostgreSQL
- Instance: The server name
- Authentication Type: Database authentication
- User Name: sde (created when you created the database)
- Password: The password
- Save User/Password: This needs to be set or database registration will fail layer.
- Database: The name specified above (postgis)
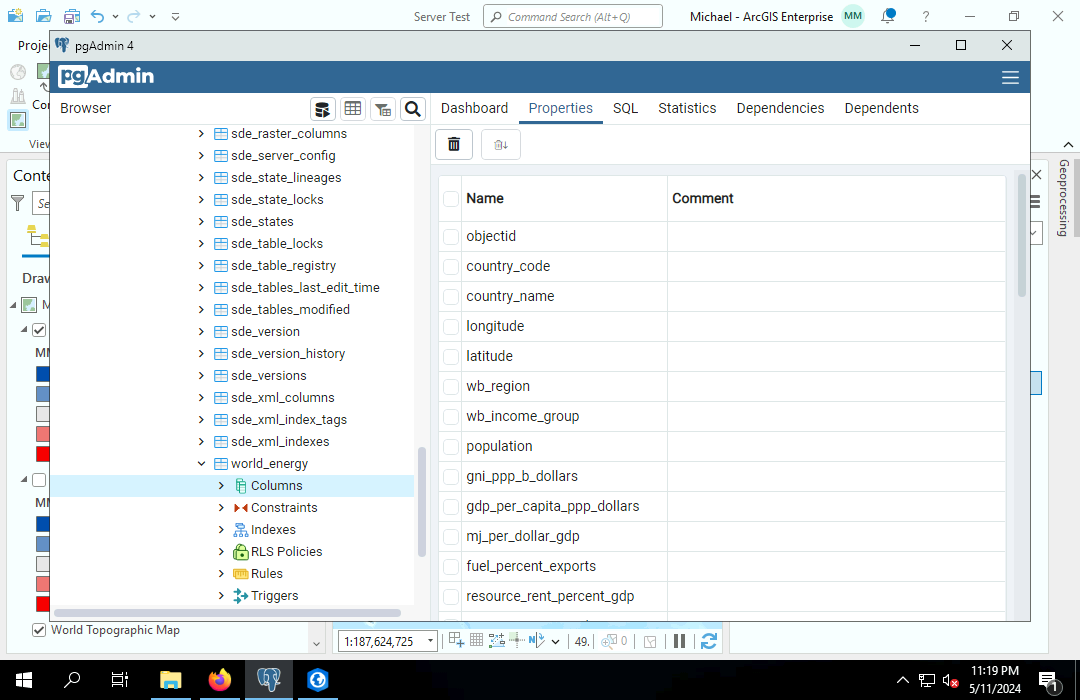
Copy and paste a test feature class from the project geodatabase to the newly connected database. You can also view the new table in pgAdmin.
Register the Data Store with Portal
To share feature services from the database, you will need to register your data store with portal.
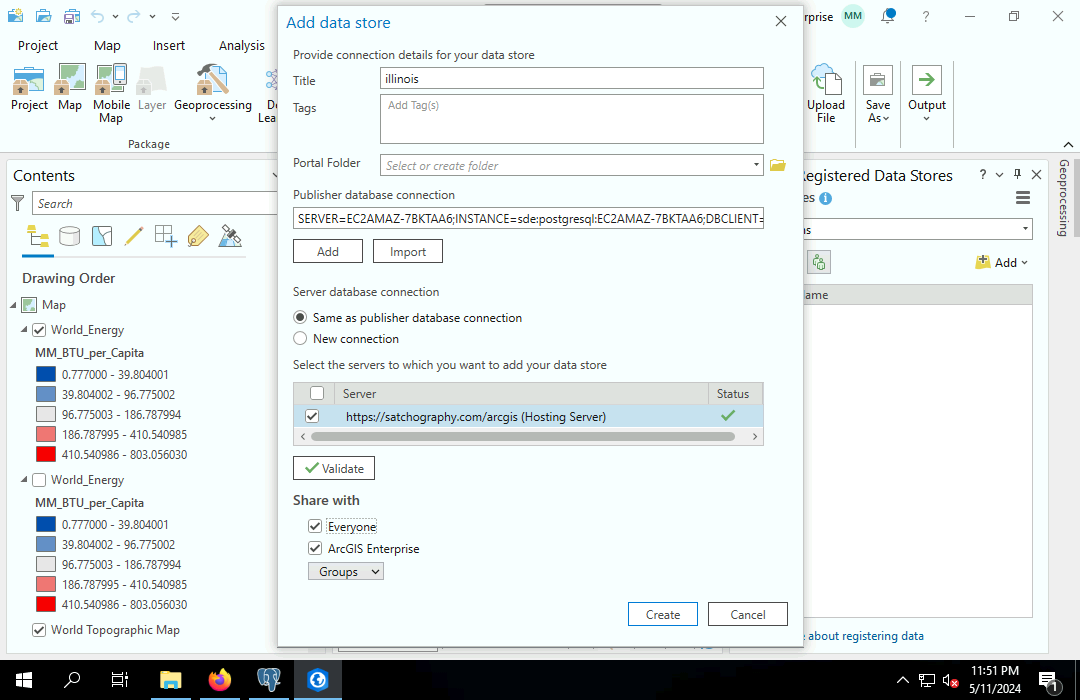
On the Share ribbon, select Data Stores, confirm that the drop-down list is set to Portal Items, and click the Add button.
- Title: The name of the data store
- Publisher database connection: Click Add and fill in the same connection information given above.
- Server database connection: Same as publisher database connection
- Select the servers to which you want to add your data store: Select your portal
- Sharing: Share as appropriate
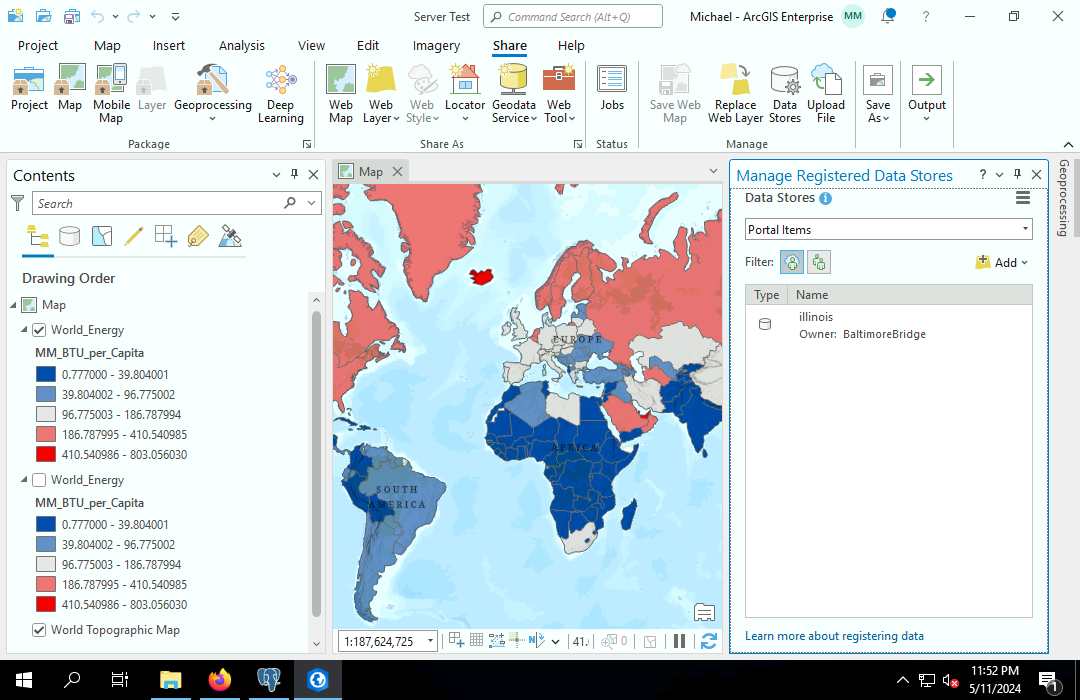
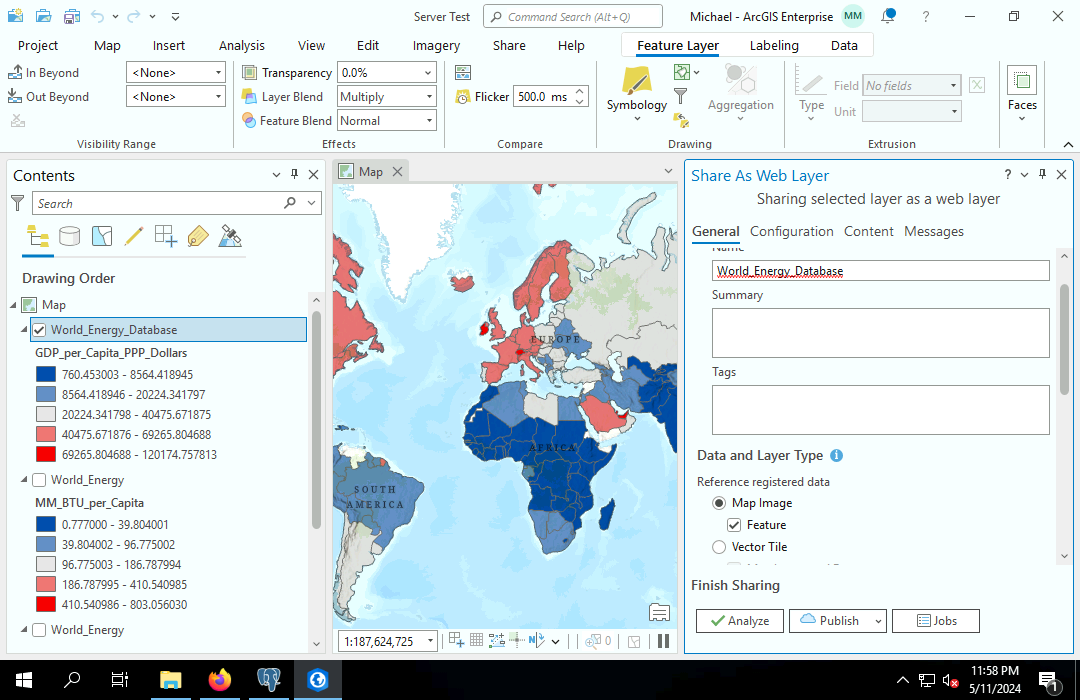
Test publish a layer using data from the database using Reference registered data and Feature.
ArcGIS Pro and Portal for ArcGIS
You can use choose between ArcGIS Online and Portal for ArcGIS as the server you use for both publishing new services and for managing existing services.
Add Portal
Go into Settings, select Portals and Add Portal with the portal URL (https://domain.com/portal)
Click the user name at the top of the screen to change the active portal that will be used when adding or publishing data.
Publishing a Feature Layer
Click the user name at the top of the screen to change the active portal that will be used when adding or publishing data.
The active portal is used when you Share as Web Layer.
Decommission
To decommission an instance, you need to delete everything you added to AWS in reverse order.
- Delete the Hosted zone. You will need to delete all records first.
- Terminate instance: Select the instance, and choose Instance state, Terminate instance.
- Delete the security group.
- Delete the Elastic IP.
- Delete the Key pair.