Geospatial Data Storage in ArcGIS Pro
Rev. 5 February 2025
This tutorial will give a basic overview of how geospatial data is stored and organized in ArcGIS Pro.
- Storage Architecture in ArcGIS Pro
- File Systems
- Projects
- Project Packages
- Tabular Data
- CSV with Latitudes and Longitudes
- CSV with ISO Country Codes
- CSV with US GEOIDFQ Codes
- CSV with US FIPS Codes
- Geocoding to Points
- Geocoding to Areas
- Geospatial File Formats
- Raster Data Formats
- Data Management Tasks
Storage Architecture in ArcGIS Pro
The key words in geographic information systems are geographic information.
Data is "factual information (such as measurements or statistics) used as a basis for reasoning, discussion, or calculation" (Merriam-Webster 2020).
Geospatial data is "data about objects, events, or phenomena that have a location on the surface of the earth" (Stock and Guesgen 2016). Geospatial data is "what is where" (Gritzner 2002).
A database is "a usually large collection of data organized especially for rapid search and retrieval (as by a computer)" (Merriam-Webster 2020).
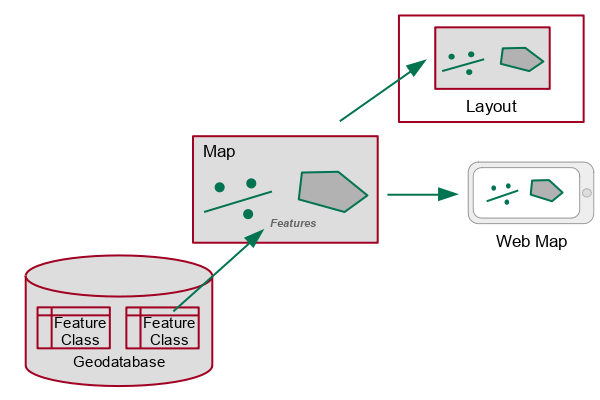
A geodatabase is special type of database containing "a collection of geographic datasets of various types" (ESRI 2020).
A feature class is a geographic dataset within a geodatabase that contain features of the same geometric type (points, lines, polygons) and a common set of attributes (ESRI 2024).
Each individual geographic entity in a feature class is called a feature. For example, in a feature class for roads in a county, each road segment would be a feature (ESRI 2020).
- Databases contain feature classes.
- Feature classes contain features.
- Feature classes are added to maps as layers that display the features on the maps.
- Maps can be placed on layouts for printing.
- Maps can be published to the web as web maps.
File Systems
Computer file systems are collections of files (often on a single storage device) that are organized in a hierarchical structure of folders, which are also sometimes referred to as directories.
Hierarchies
Hierarchical file systems organize data files in categories and subcategories. This categorization not only makes it easier to understand how to access specific files or groups of files, but also facilitates portability, sharing, and access control.
While in the era of the cloud, end users often access conceptually flat collections of data using search engines (on the web) and search functions (in apps), the administrators and developers of online systems still need to organize data hierarchically to make management easier. Accordingly, as a GIS professional, you will need to be able to both navigate existing hierarchical file systems and develop hierarchical categorizations to organize your data.
The following is an example of a hierarchy
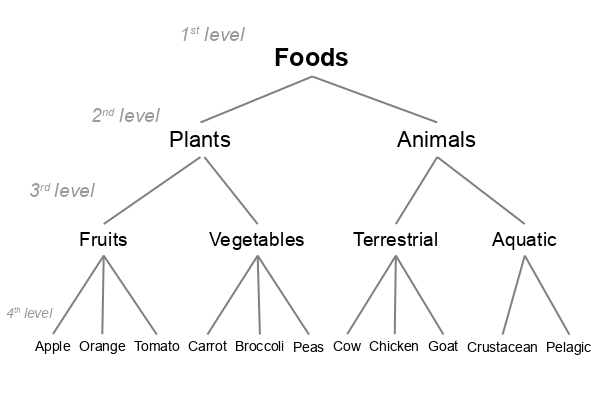
Hierarchies in text are commonly written as text using indentation and different bullet point symbols to visually show the relationship
- Foods
- Plants
- Fruits
- Apple
- Orange
- Tomato
- Vegetables
- Carrots
- Broccoli
- Peas
- Animals
- Terrestrial
- Cow
- Chicken
- Goat
- Aquatic
- Crustateons
- Pelagic
File Paths
A file path points to a specific file within the hierarchical folder structure of a file system (W3Schools 2022). A path consists of three components:
- An identifier naming the file system
- The different levels of folders and subfolders in a file path presented in a sequence of folder names separated by slashes (/) or, on Windows file system, backslashes (\).
- The name of the file within the lowest level folder.
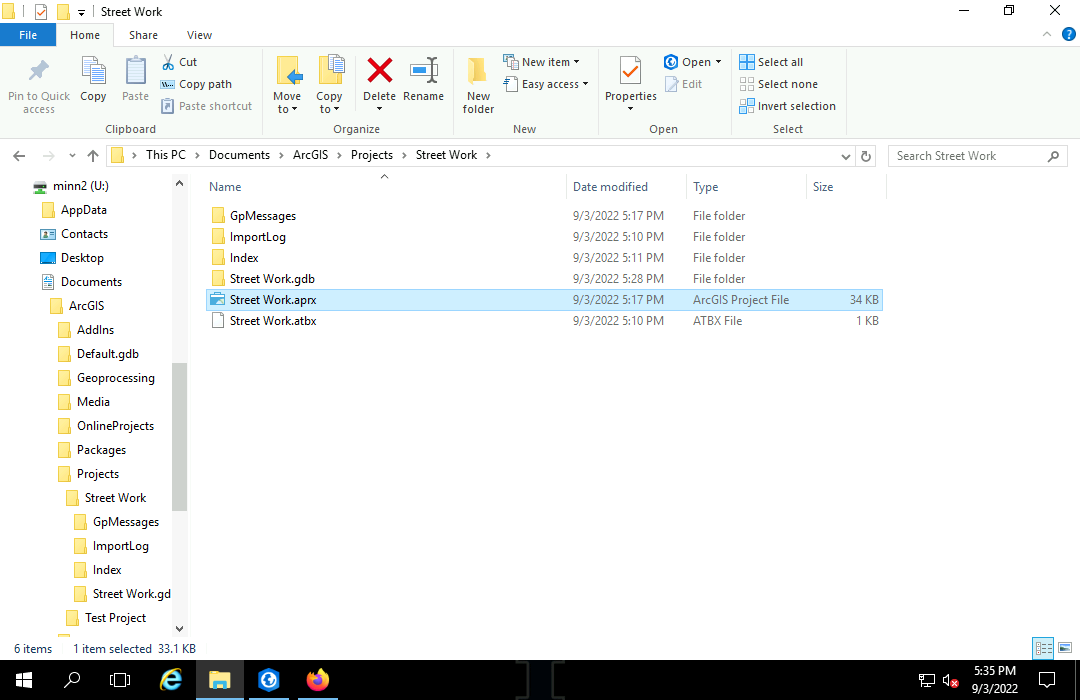
This example shows the hierarchy in Windows Explorer to the file at:
U:\Documents\ArcGIS\Projects\Street Work\Street Work.aprx
File System Names
Computers can have multiple file systems. The specific file system is the leftmost term in a file path. File systems can be specified in multiple ways on Windows machines (Microsoft 2022):
- Traditional DOS paths begin with a drive letter followed by a colon.
C:\Users\joe\Documents\ArcGIS\Projects\Street Work\Street Work.aprx
\\Server2\Share\Documents\ArcGIS\Projects\Street Work\Street Work.aprx
\\192.168.100.3\deptusers\minn2\Documents\ArcGIS\Projects\Street Work\Street Work.aprx
Windows File Systems
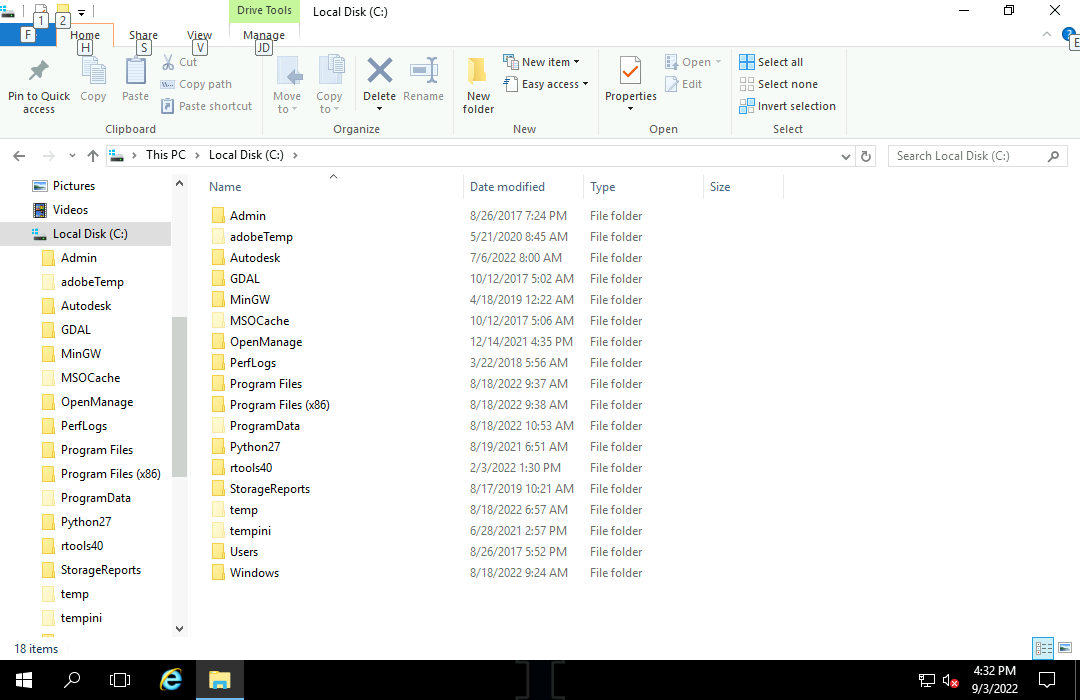
The primary (local) file system on a Windows computer is usually the C: drive. A: and B: were drives for removable floppy disks, which are now obsolete (Wikipedia 2022).
The primary file system is used for operating system and installed program files.
Home Directories
A home directory is "a file system directory on a multi-user operating system containing files for a given user of the system" (Wikipedia 2022).
Home directories on Windows systems have a standard set of subfolders for user files.
- Desktop
- Documents
- Downloads
- Music
- Pictures
- Videos
The full paths to these locations depends on the configuration of the system.
- On personal computers with only one file system, the primary file system is also used for user home directories in the \Users directory. For an example user named joe:
C:\Users\joe
\\netserver12\netusers\joe
\\192.168.100.3\netusers\joe
/home/joe
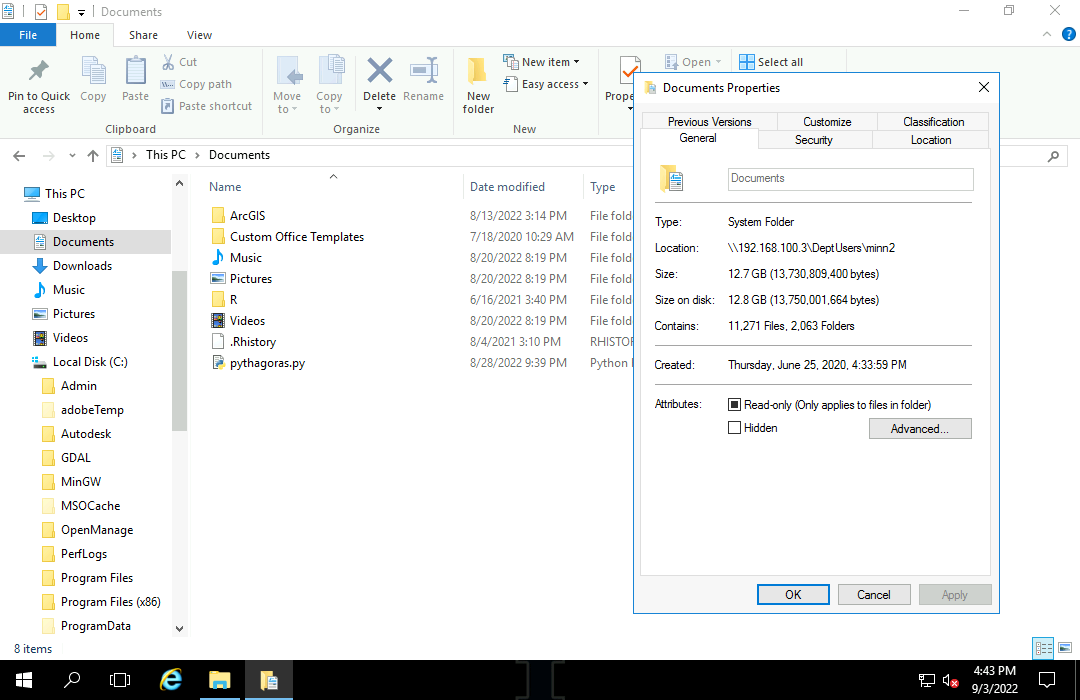
You can view the location of folder by right clicking on the folder in the Windows Explorer and showing the Properties. In this example, the Documents user subfolder in a home directory on a network drive is located at \\192.168.100.3\DeptUsers\minn2\Documents.
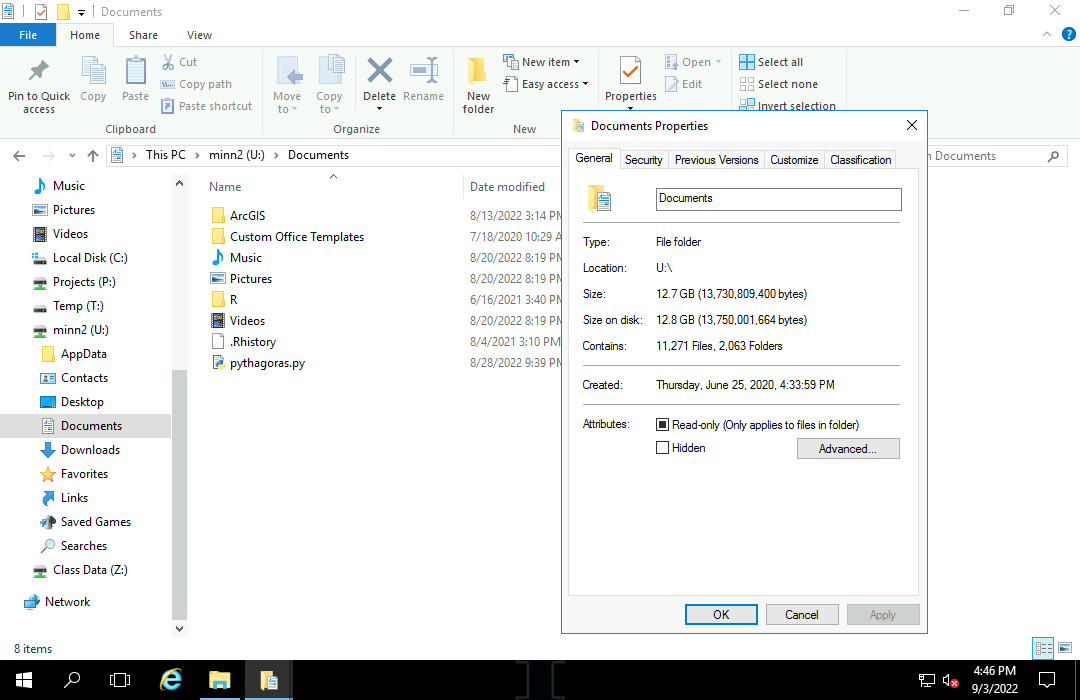
Network file systems are sometimes also mounted to drive letters. For example, the Documents folder in this network file system is also located under the U: drive letter.
File Types
A file's type determines what kinds of software can operate on that file. A file name extension is suffix on a file name consisting of a period and (usually) three or four letters that indicate the file type.
Some common file extensions (with the software typically used to view or edit the files) include:
- .txt : Text file (Notepad or Word)
- .csv : Comma-separated variable file (Excel)
- .pdf : Portable document format file (Adobe Acrobat or a web browser)
- .png : Portable network graphics image file (Photoshop, Paint, or a web browser)
- .jpg : Joint Photographic Experts Group (JPEG) image file (Photoshop, Paint or a web browser)
- .zip : ZIP archive (Windows Explorer or 7-Zip)
- .docx : Word document
- .xlsx : Excel spreadsheet
- .aprx : ArcGIS Pro project files
- .ppkx : ArcGIS Pro project packages
Projects
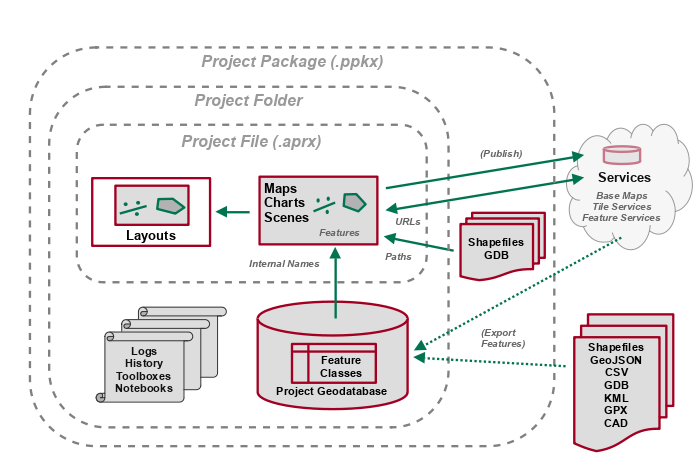
An ArcGIS Pro project brings together data from different sources to perform mapping and analysis.
Project Folders
Files associated with a project are kept in a project folder, which is usually a subdirectory under <home>\Documents\ArcGIS\Projects.
The project folder contains:
- The project file with a .aprx suffix
- The project geodatabase in a folder with a .gdb suffix
- The optional project toolbox file with an .atbx suffix
- Additional folders for logs, messages, backups, etc.
Project File (.aprx)
A project file is a file with an .aprx suffix that contains design and source information for data, maps, and layouts that are part of the project.
- An .aprx file is what is saved when you File -> Save a project.
- The .aprx file only saves information about where the different components in a project are kept on your local file system or in the cloud.
- The .aprx file does not include the feature classes or other data associated with a project and if you just copy the .aprx file to another machine, it will have missing components if it references any data or files from your local file system.
Project Geodatabase
The project geodatabase is the default geodatabase used for storing geospatial data that is imported or created as part of your project.
- The project geodatabase is a file geodatabase kept in the project folder under the name <project_name>.gdb
- When you import CSV points with the XY Table To Point tool, the new point feature class is saved to the project geodatabase by default unless you specifically indicate to save it elseqhere.
- When you run an analysis tool like Create Buffers, the new feature class created by the tool is saved to the project geodatabase by default unless you specifically indicate to save it elsewhere.
- The project geodatabase does not store data brought in to maps with Add Data from feature services or from geospatial data files (like shapefiles) unless you explicitly copy that data into the project file geodatabase using a tool like Export Features or Copy Features.
- The contents of the project database can be viewed in the Catalog Pane.
Project Packages
A project package is a single-file bundle all of the files, feature classes, and map design information used in a project. Project package file names have the suffix .ppkx.
- Project package files can be uploaded to ArcGIS Online, and then downloaded to a new machine so you can be assured that you are using all of the same components that you used when you last edited the project.
- Project packages allow you to share your work with collaborators or instructors.
- Project packages are especially helpful when you are working in a remote desktop environment where you get a new virtual machine every time you log in, and you cannot be assured that anything you saved on your local drives will persist after a single session.
- They are also useful for archiving the local contents of projects so that you have everything together in one place if you wish to revisit that project in the future.

To create a project package file:
- On the Share tab and Package area, select Project.
- Give your project a meaningful name. The same name as the project is usually a good choice.
- Unless you are working with a group, you can usually just leave the Summary and Tags boxes blank.
- Share Outside Organization should be checked if your project uses files (like shapefiles or feature services) that are not included in your project geodatabase.
- Checking this box when using large feature services may result in long save times required to download all data from the feature service. In such cases, it may be better to either uncheck Share Outside Organization or Export Features from the feature service into the project geodatabase.
- Include History should generally not be checked. Project packages require your history to be free of errors. If you run a tool and it fails, your history will contain that error and saving the project package may fail with a cryptic error message.
- Include Toolboxes should be checked if you are using ModelBuilder or Python notebooks.
- Click Analyze and fix any identified problems. Unfortunately, analyze is of limited value and will often miss major problems that will cause your packaging to fail later.
- Click Package to create the package and upload. This can take a few minutes if your project contains large data files like rasters.
- To get a link to your project package, view your Contents page in ArcGIS Online, click on the name to open the information page for the project package, and copy the URL from the location bar.
Reopening Project Packages
To reopen a project from a project package, go to Project, Open, Portal, My Content, and select the package to open.
- The package file is decompressed into a project folder under <home>\Documents\ArcGIS\Packages.
- The package folder will be the name of the project with additional text added to make the package folder unique. In the example below, the Street Work folder has the additional text, giving it the name Street Work_34d855.
- The package folder will contain a p20 folder for legacy version files that can be opened by ArcGIS Pro version 2.x, and a p30 folder with files for the current version 3.x.
- Under p30 you will find the .aprx project file and the .gdb folder for the project geodatabase (if one exists).
- ArcGIS Pro allows you to have a Projects folder and multiple Packages folders for different versions of the same project, which can be confusing.
- Accordingly, when you have multiple listings in your Recent Projects list with the same name, caution should be used to assure you are opening the most current version of the project.
Project Versions
Once you have reopened a project package and modified the project, you should always work from a reopened project package.
- Each time you reopen a project package, ArcGIS Pro creates a new copy of the project in a new folder in local storage on your machine.
- This can result in multiple folders for different versions of the same project, which may all be listed in your recent projects list in the ArcGIS Pro startup dialog.
- Inadvertently opening an older version of your project from local storage may cause you to lose work you did in the most recent version.
Tabular Data
Geospatial data is often stored and distributed in tables.
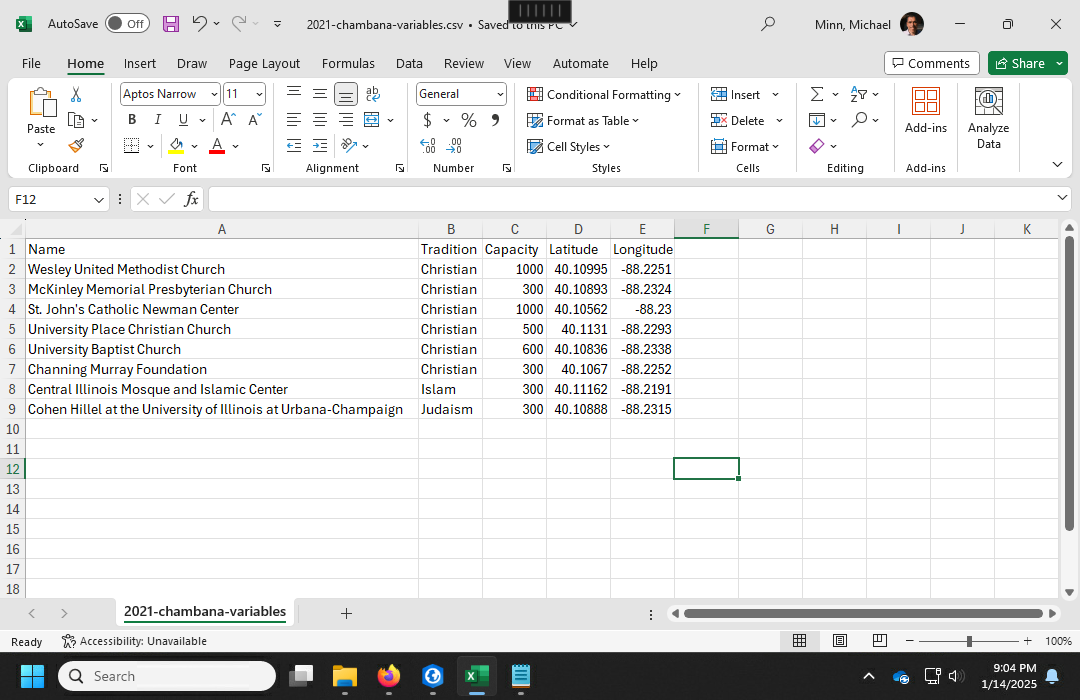
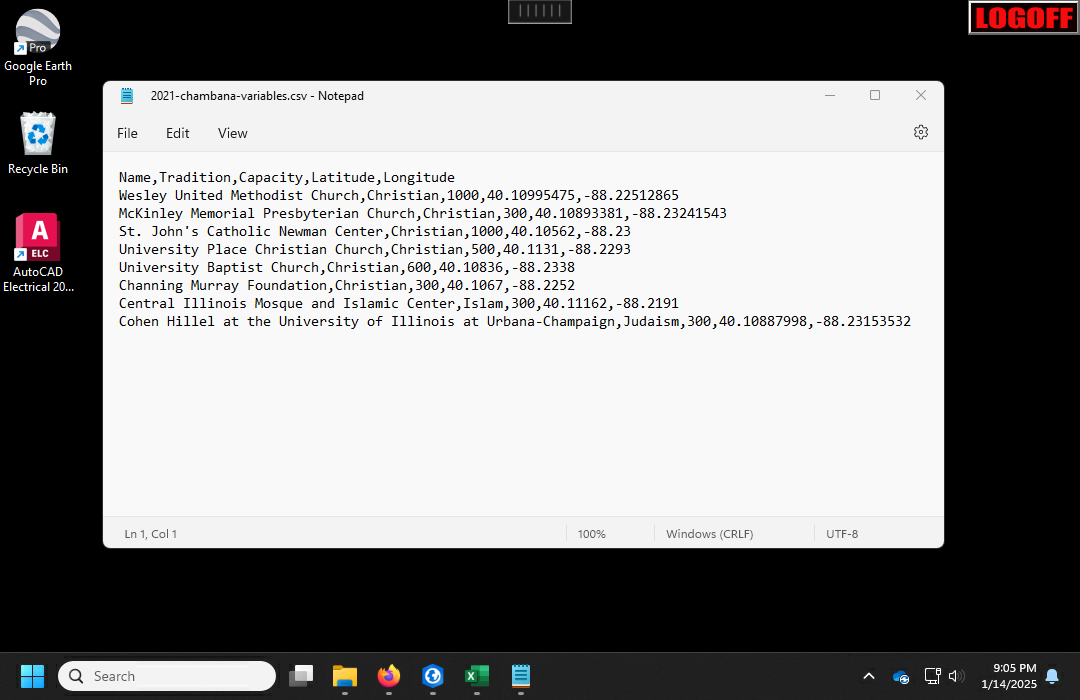
- The comma-separated variable (CSV) format is a text format that arranges table data in rows, with column cells separated by commas.
- CSV files can be thought of as spreadsheets, and they are commonly edited using spreadsheet software like Microsoft Excel, but CSV files do not preserve formatting information.
- Aside from ease of use, the simplicity of a CSV file has an advantage in its potential for data preservation since CSV files will likely be readable for generations to come, while complex file formats (especially proprietary formats) will become obsolete as technology changes.
- Representing anything in CSV files other than points is unweildy, so for lines (like roads) and areas (like neighborhoods or census tracts) you need to save data in a specialized geospatial data file format like the shapefile.
CSV with Latitudes and Longitudes
CSV files can be used for geospatial data with columns of latitude and longitude associated on each row with specific attributes at those latitudes and longitudes.
The following video demonstrates how to import a CSV file with latitudes and longitudes to create a feature class. This example uses data on COVID-19 cases and fatalities in US states gathered Johns Hopkins University of Medicine and made available through GitHub.
- Acquire: Create or download the CSV file with location coordinates in columns named "Latitude" and "Longitude"
- Start: Create a new map in ArcGIS Pro and give it a meaningful name.
- Add: Select Add Data -> XY Point Data to run the XY Table to Point tool.
- Select the CSV file from your computer's local file system.
- Give the new layer a meaningful name. Note that this name should contain only letters and numbers with no spaces or punctuation.
- Run the tool to perform the import.
- Symbolize: Adjust the symbology of the layer as needed.
- Present: Create a print layout with a legend.
- Export to create a figure or printable map.
CSV with ISO Country Codes
The International Organization for Standardization (ISO), an international non-governmental organization, defines a set of three-letter country codes (alpha-3) that are commonly used to uniquely identify countries in data.
Indicator data from the World Bank includes ISO country codes, and they can be used to join downloaded table data with country polygons for choropleth mapping. ISO codes are preferred to country names to avoid mismatches due to differences in spelling, capitalization, and name formality.
For this example we will use the Annual freshwater withdrawals, total (% of internal resources) indicator from the World Bank. Country polygons are from Natural Earth via the Minn 2023 World Polygons feature service in the U of I ArcGIS Online organization.
- Acquire: Download the indicator data into Excel,
- Remove the unneeded columns.
- Rename the year data column to something meaningful (Freshwater_Percent_2021).
- Export to a CSV file (freshwater.csv).
- Store: Run Export Table to bring the table into the project geodatabase (Freshwater_Table).
- Store: Under Analysis, Tools run the Export Features tool to import the world polygons.
- Input Table: Find the Minn 2023 World Polygons ArcGIS feature service in ArcGIS Online.
- Output Feature Class: Freshwater
- Process: Under Analysis, Tools run the Join Field tool to join the data field to the country polygons.
- Input Table: Freshwater
- Input Field: ISO_A3
- Input Table: freshwater.csv
- Input Field: Country Code
- Transfer Fields: Freshwater_Percent_2021
- Communicate: Symbolize the resulting layer by the new variable.
CSV with US GEOIDFQ Codes
Data from the US Census Bureau (USCB) can be downloaded from data.census.gov in table format for a variety of geographic area types.
The USCB tables include fully-qualified GEOIDs (GEOIDFQ) that combine FIPS codes (see below) with prefixes that indicate what type of area (state, county, tract, etc.) is represented on each row.
- GEOIDFQ have an advantage over FIPS codes in that GEOIDFQ prefixes remove ambiguity of what types of areas FIPS codes represent, and eliminate the problem of leading zeros in FIPS codes being removed by software that treats the codes as numbers.
- GEOIDFQ can be used to join table data with USCB TIGER Cartographic Boundary Files for mapping and analysis.
- GEOIDs and FIPS codes are described in more detail in this tutorial.
For this example we create a feature class of median household income in Illinois counties from the American Community Survey 2019-2023 five-year estimates, table S1901.
- Acquire: Download data from data.census.gov.
- View the profile page for the United States to browse available variables. You can type variable names in the search box, but the volume of results can be overwhelming.
- Click the table name under the desired variable (S1901).
- Select the Geos for the desired geographies (County, Illinois, All Counties within Illinois).
- Click Download Table Data, check the box beside the desired table, and click Download.
- Choose the desired Table Vintage. This example uses the latest (2019-2023) five-year estimates, which provide more complete geographic coverage than one-year estimates.
- View the downloaded .zip archive file in the Windows Explorer, right-click, and Extract All... to extract the shapefiles into a folder that can be accessed in ArcGIS Pro.
- Process: Clean up the data table in a spreadsheet program (1:21).
- Find the desired variable column and remove all columns except the GEOIDFQ (GEO_ID) and the desired variable.
- Rename the variable column to something short but meaningful (Median_Household_Income). unnecessary columns.
- Remove the description row #2 so that all variable cells below the top header row contain only numeric values.
- Save as a CSV file (income.csv).
- Acquire: Download the TIGER Cartographic Boundary File with county polygons and unzip the file (2:52).
- Process: Under Analysis, Tools, run the Join Features tool to join the data table and polygons into a new feature class in the project geodatabase (3:39).
- Target Layer: Browse to find the county polygons shapefile. You may need to click the refresh button so all folder contents are visible.
- Join Layer: Browse to find the data table CSV file.
- Output Name: Browse to provide the name for the new feature class in the project geodatabase (Median_Household_Income).
- Keep All Target Features: Leave this unchecked so that only polygons for counties with data are included in the new feature class.
- Attribute Relationship:
- Target Field: Select the GEOIDFQ field in the polygon data.
- Join Field: Select the GEO_ID field in the table data.
- Summary Fields:
- Field: The variable field (Median_Household_Income)
- Statistic: Any
- Communicate (5:28):
- Symbolize the resulting layer by the variable.
- Use multiply blending so the base map is visible through the choropleth.
- Under Map, Properties, change the projection (CRS) to a cartographically-appropriate projection (Web Mercator) as needed.
- Under Format Labels, add thousands separator columns or adjust the number of decimal points as needed.
Common problems with joins include:
- Table or shapefile not visible when browsing: Press the refresh button at the top of the file dialog. Annoyingly, Pro does not automatically refresh the contents of file dialogs when you add or remove items from folders.
- Variable coming in as text rather than numbers: Make sure that the variable column in your CSV file contains only numbers except for the header name in the top row.
- Output feature class is empty (no features joined): Check to make sure the target and join fields are both fully-qualified GEOIDs. Make sure your shapefile and data both have the same type of geography (both counties, both tracts, etc.).
- Error 99999: This is an unhelpful generic error code thrown by an error that the software is not designed to handle. In some cases, trying the operation a second time or completely shutting down and restarting the software can solve this issue. Google or AI may also be your friend for specific situations that you can describe.
CSV with FIPS Codes
US data from organizations other than the US Census Bureau often provide locations as FIPS codes that can be used to construct fully qualified GEOIDs for joining with US Census Bureau polygon data. GEOIDs and FIPS codes are described in more detail in this tutorial.
For this example, we use county-level data from the 2020 US Religion Census, which is produced by the Association of Statisticians of American Religious Bodies.
- Acquire: Download and open the county-level summary data.
- Use the CONCATENATE() function to add a GEOIDFQ column with the 0500000US prefix used for counties in front of the FIPS codes.
- Give the columns short but meaningful names.
- Reformat all percentage columns as numeric so the percent signs do not confuse ArcGIS Pro.
- Save as a CSV file (Religion_Table).
- Store: Import the CSV file into the project geodatabase.
- Run Export Table to bring the table into the project geodatabase (Different_State_Table).
- Add the Fields and make sure all numeric fields are LONG (counts) or DOUBLE (amounts).
- Acquire: Download the TIGER Cartographic Boundary File with county polygons and unzip the file.
- Store: Import the county polygons into the project geodatabase.
- Under Analysis, Tools run the Export Features tool to export the shapefile polygons into a feature class in the project geodatabase (Religion).
- Note that you must select the feature class name by browsing into the project geodatabase. Otherwise the shapefile will simply be copied into a separate shapefile.
- Process: Under Analysis, Tools run the Join Field tool to join the data field to the county polygons.
- Communicate: Symbolize the resulting layer by the desired variable.
Geocoding to Points
Locations on the surface of the earth are often referenced using place names rather than numeric coordinates - most notably in street addresses.
Geocoding is the process of converting place names to latitude/longitude coordinates.
- Geocoding involves parsing the place names into component parts (state, city, street name, number, east/west, etc), and then looking up those parts in a large database of possible locations in an area.
- Because there are billions of possible addresses, and a variety of different formats for writing addresses, accurate geocoding requires large, expensive databases and powerful computers. Geocoding using artificial intelligence is an active area of development (Lee, Claridades, and Lee 2020).
- Google Maps is popular, in part, because Google has built the technology and resources to support lightning-fast geocoding of both addresses and landmark/business names.
- Geocoding always involves some level of uncertainty, and you should verify that all the geocoded points are in the right place if the accuracy of your map is important.
In this example, we use a CSV file of in-person FedEx shipping or printing locations from the company's website. Although they provide a map, the only location information directly available is the address, which was entered into a spreadsheet with the columns: Name, Address, City, and State. Geocoding of addresses is a common task needed when performing business analysis in GIS.
- Acquire: Download the CSV file or create it in a spreadsheet program like Excel and save it as a CSV file.
- Start: Create a new map in ArcGIS Pro.
- Add: In a new map, Add Data with the table.
- Right-click on the table and select Geocode Table.
- Follow the instructions to choose the options for geocoding.
- Symbolize: Adjust the symbology for the new layer.
- Change the map projection to WGS 1984 Web Mercator, which is a good generic projection used with web maps.
- Add labels, if desired.
- Adjust the base map in case the map is cluttered.
- Present: Create a print layout
- Add a legend (if needed).
- Export to print or insert as a figure.
Geocoding to Areas
If you have data for areas, but only have place names, you can geocode to points and then spatial join the points to area polygons.
Geocoding to areas is unreliable and error prone, so this is a technique of last resort and you should use a standardized code whenever one is available.
The Food and Agriculture Organization of the United Nations (FAO) collects a vast array of open country-level agricultural data and makes it available to the public through their FAOSTAT web portal.
This example uses FAO data for almond production by country. While almonds are delicious and nutritious (THC School of Public Health 2023) growing almonds is very water-intensive (Fulton, Norton, and Shilling 2019), so knowing where almonds are grown can point us to areas where agriculture may have a detrimental water footprint.
The only geospatial components the FAO tables contain are country names and FAO country codes, so one approach to creating choropleths is to geocode by country name to create points that can be joined to polygons for choropleth mapping.
- Acquire: Download the table and open it in a spreadsheet program like Excel.
- Process: Clean up the table.
- Remove all unneded rows and columns.
- Make sure the top header row should contain your variable names (Country, Almond_Tonnes).
- Make sure all rows in the location column have valid location names. Note that almond trees are native to the Mediterranean and require warm weather, which limits the number of countries where they can be grown.
- Save As the spreadsheet as a Comma Separated Variable (CSV) file.
- Process: Under Analysis, Tools run the Geocode Addresses tool.
- Input Table: Your CSV file with country names (Almond_Table)
- Input Address Locator: ArcGIS World Geocoding Service
- Input Address Fields: Single Field (Country)
- Output Feature Class: Almond_Table
- Location Category: Populated Place, Country
- Estimate credits: Single digits is usually good
- Store: Under Analysis, Tools run the Export Features tool to import the world polygons.
- Input Table: Find the Minn 2023 World Polygons ArcGIS feature service in ArcGIS Online.
- Output Feature Class: Countries
- Process: Under Analysis, Tools run the Spatial Join tool to join the table data to the country polygons.
- Target Features: Countries
- Join Features: Almond_Table
- Output Feature Class: Almonds
- Keep All Target Features: Leave selected
- Communicate: Symbolize the resulting layer by the new variable.
Geospatial File Formats
There are a variety of common data file formats specifically designed for geospatial data that can be read into ArcGIS Pro for mapping and/or publication.
Shapefiles
The shapefile is a geospatial data file format developed by ESRI with a standard published in 1998.
While the age of this format is reflected in its numerous limitations (such as column name length limit of 10 characters), this format is still commonly used for distributing geospatial data because it is reliable and well supported by a wide variety of GIS software.
The term shapefile is a misnomer since a shapefile is actually a collection of at least three (and usually more) separate files that store the locational data, the characteristics associated with those locations, and other information about the data.
Some common files associated with a shapefile include (listed by the file extension):
- .shp: Contains the feature geometry (points, lines, polygons)
- .shx: An index file that indicates where specific features are in the .shp file
- .dbf: A dBase IV database file of attributes associated with each of the shapes in the .shp file
- .prj: The coordinate system and projection used by the feature geometry (optional)
- .cpg: The character encoding used by the attributes (optional)
- .qpj: The coordinate system and projection in a format used by QGIS (optional)
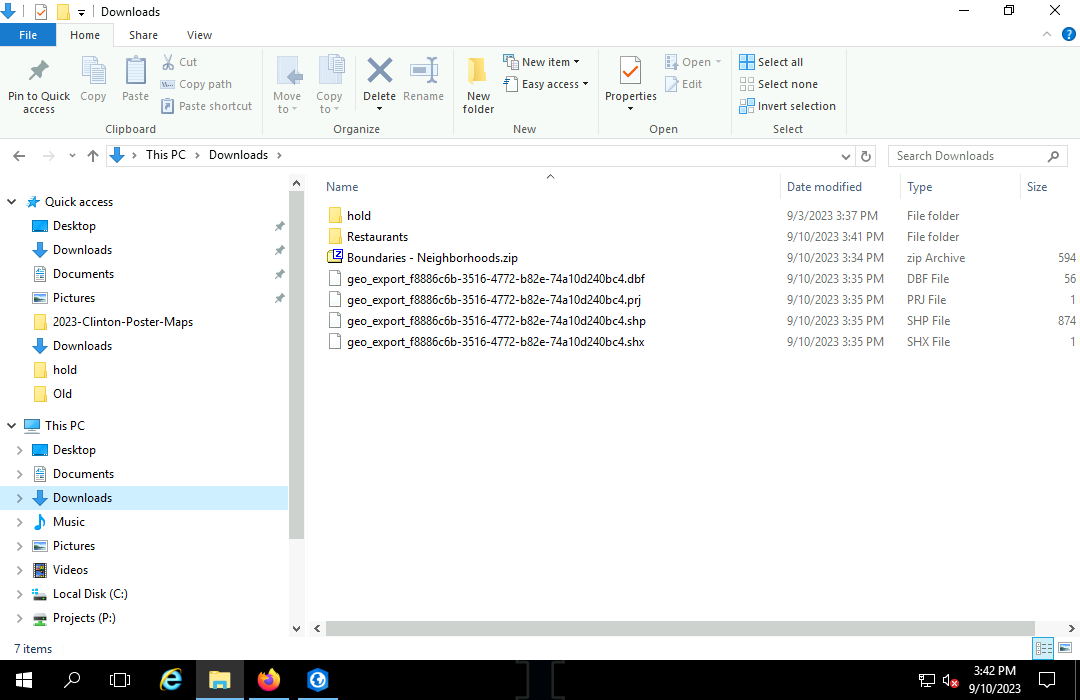
To help keep all these files together, they are usually compressed into a single .zip archive file for distribution on websites and servers.
- Acquire: Download the shapefile .zip archive from the website.
- Process: In Windows Explorer, extract the contents of the .zip archive file.
- Store: Under Analysis, Tools find the Export Features tool to export the shapefile data into a feature class in the project geodatabase.
- Input Features: Find the shapefile on your local storage.
- Output Feature Class: Provide a short but descriptive name for the feature class with no punctuation or spaces (Chicago_Neighborhoods). You may need to click the folder and select the project geodatabase so that the tool exports into the database rather than just copying to another shapefile.
- Run the to save the shapefile data. This should add the data as a new layer to your map.
- Communicate: Symbolize as needed.
GeoJSON
GeoJSON is an extension to JavaScript Object Notation (JSON) that is used for data displayed in web maps.
- GeoJSON supports vector points, lines, and polygons.
- ArcGIS Pro can convert to and from GeoJSON using the Features To JSON and JSON To Features tools, respectively.
- The ArcGIS Pro GeoJSON tools are buggy and sometimes have problems importing GeoJSON files created with other software.
GPX
The GPS Exchange Format (GPX) is another XML-based format that is commonly exported by GPS tracker apps in smartphones to store GPS points.
- Although GPX files can contain a variety of different types of data, the data of primary interest is usually a sequence of waypoints, which are GPS latitude/longitude locations that are regularly captured by the tracking app as it records.
- Waypoints commonly include the date and time when they were recorded and an elevation supplied by GPS.
- The approximate paths of travel can be connecting the waypoints with lines.
- Speed can be estimated based on the distance between waypoints divided by the difference in time between waypoints.
GPX files can be imported into ArcGIS Pro using the GPX To Features tool, which can import the waypoints as individual point features, or as a path line.
GeoPackage
The GeoPackage format uses an open standard for storing multiple geospatial data sets in SQLite package files with the .gpkg suffix.
This video demonstrates how to download and import a GeoPackage of transportation data from the USGS TNM Download (v2.0) web app.
- Acquire: Go to the TNM Download (v2.0) page.
- Datasets: Transportation
- Data Extent: State
- File Formats: GeoPackage
- Zoom to the state and click Search Products.
- Find the data in the search results.
- Right-click on Download Link (ZIP) and download.
- In the File Explorer, right click on the .zip file and Extract all.
- Store: Open the Export Features tool.
- Import Features: Brows to your Downloads folder, find the .gpkg file and the Trans_RoadSegment feature class.
- Output Features: Browse to your project geodatabase and save a new feature class (TNM_Roads).
- A statewide dataset will be quite large and may take a few minutes to export.
- Process: If you have a polygon you can use the Clip tool to clip the very large state dataset to a more specific area.
- Input Features or Dataset: The state roads (TNM_Roads).
- Clip Features: The polygon(s) to clip to.
- Output Features or Dataset: The clipped feature class (Roads).
- In the Catalog Pane, remove the statewide data set to reduce the storage space used by your project.
- Communicate:
- Change the Coordinate System to a cartographically appropriate projection (Web Mercator)
- Symbolize by Unique Values based on the tnmfrc_description
- Repeat with the Trans_RailFeature feature class for railroads.
ESRI File Geodatabases
In 2006, ESRI introduced geospatial data file format called the file geodatabase.
- A file geodatabase is a proprietary data file format that is designed to fully support the features of ESRI software and can only be read with ESRI software.
- ArcGIS Pro uses the file geodatabase format for storing project databases in project folders.
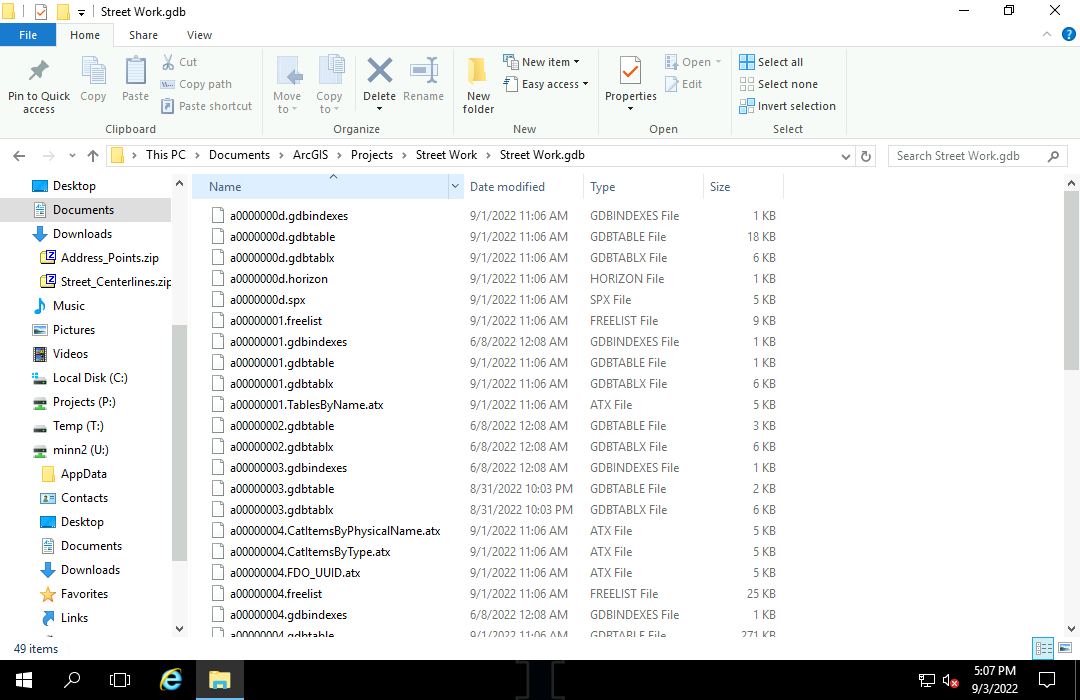
- Like a shapefile, the file geodatabase is a collection of different files, with all files kept in a folder that has a .gdb extension.
- As with shapefiles, file geodatabases can be exchanged by copying them in .zip archives that can be e-mailed or posted on websites.
Keyhole Markup Language (KML)
Google Earth/Maps exchanges geospatial data in the Keyhole Markup Language (KML) format that is based on Extensible Markup Language (XML).
KML is designed for the web and contains information on how the geospatial data should be displayed on a web map like Google Maps, or in Google Earth. While you can use KML files for general exchange of spatial data, it usually only optimal when exchanging data to or from Google apps.
- KML supports vector points, lines, and polygons, and unlike shapefiles can include multiple types of geometries in a single file.
- KML can be imported and exported to/from ArcGIS Pro using the KML to Layer and Layer to KML tools, respectively.
- Since KML was designed for simple web mapping, complex attribute data can get lost when KML files are used to share data between dissimilar software.
- Most GIS software can read KML files, but shapefiles are usually preferred for serious analysis or when working with data sets of any significant size.
- Because KML files can contain multiple types of geometries Layer to KML creates its own database and .lyrx file in the project folker.
AutoCAD
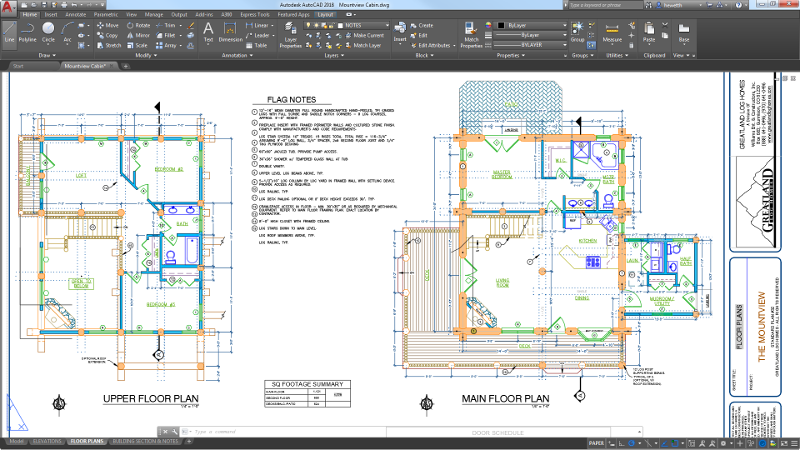
If you work with GIS in the construction industry, you will likely see geospatial data stored in the files used by the engineering drafting program AutoCAD. However, AutoCAD is a general use drafting program for objects of all sizes and the proprietary file format often does not contain adequate coordinate or attribute information to allow data to be transferred directly into GIS software.
Raster Data Formats
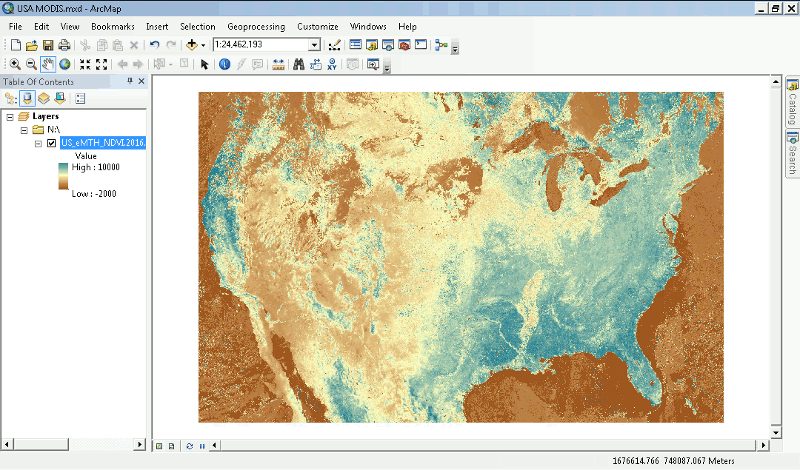
Remotely-sensed raster data from satellites and other aerial platforms is stored in a wide variety of formats like:
These file formats are specialized to raster data and are discussed in much greater practical detail in classes or tutorials on remote sensing.
Data Management Tasks
ArcGIS Pro has dozens of tools for performing helpful data management tasks that you can review in this An overview of the Data Management toolbox.
This section covers a handful of common data management tools and tasks.
Exporting Data
There may be occasions where you need to export data to a file either to archive the data or to share it with a collaborator or the community. As described above, while shapefiles have serious limitations, they are a safe choice when sharing geospatial data.
- Under Analysis, Tools search for the Feature Class to Shapefile tool.
- The Input Features is the feature class you want to export.
- Under Output Folder create a new folder for the shapefile files.
- Run the tool.
- In Windows Explorer, right click on the folder containing the shapefile files, and select Send to, Compressed (zipped) folder.
- You can then use the .zip file to share the shapefile.
Merging Data
You may have a need to merge (combine) two or more feature classes into a single feature class when updating or augmenting a data set.
- If you are bringing in data from a shapefile, unzip the shapefile into a folder that can be read by ArcGIS Pro.
- Under Analysis, Tools find the Merge tool.
- For the Input Datasets select the feature class(es) and shapefile(s) that you want to merge (Illinois_Tourism feature class and Missouri_Tourism shapefile).
- Give the Output Dataset a meaningful name in the project database (Illinois_Missouri).
- If needed, adjust the Field Map to make sure all fields are combined to appropriate output fields.
- In this case, the shapefile truncates the name of the Annual Visitors field to the shapefile limit of ten characters (Annual Vis), so you need to map Annual Vis to Annual Vistors and remove Annual Vis from the list.
- Run the tool.
- Symbolize the merged dataset if needed.
Repairing Broken Source Paths
You may occasionally encounter an issue with broken source path, where the data for a layer is no longer at the file path stored in the project file. This will be indicated with a red exclamation mark beside the broken layer in the Contents pane.
Situations like this can occur when:
- You are reopening a project package that does not contain the original data because you did not save with Share outside organization checked.
- Someone has sent you a project file (.aprx) and you are trying to open it without the associated project folder and project geodatabase.
- You have moved or deleted the shapefile used to create the layer.
To fix a broken source path:
- Recover the data needed for the layer and make sure it is in your local file system.
- Use the Windows File Explorer to find the folder name where the data is located.
- Right-click on the broken layer and select Properties and Source.
- Click Set Data Source to change the source path to the correct location.
- When you click OK, the data should appear on your map.
Set Data Source
When possible, it is a good practice to bring your data into the project geodatabase rather than relying on external shapefiles or file geodatabases. Shapefiles can be slow to work with and it is easy to misplace external data files, rendering your project unusable.
For this example, the layer on the map was originally added from a shapefile with Add Data. To copy the data into the geodatabase and change the source without having to recreate the symbology:
- From Analysis, Tools run the Export Features tool to copy the shapefile data into a new feature class in the project geodatabase.
- Remove the new layer automatically added by Export Features since you will be setting the data source on your old layer.
- In the Contents pane for the layer's Properties, view the Source and Set Data Source from the shapefile to the new feature class.
Appendix
Digital Data
In contemporary geographic information systems, geospatial data is stored as digital data.
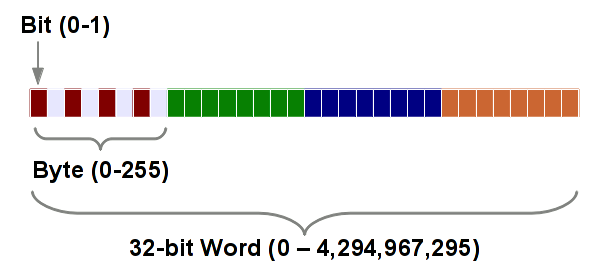
As the name implies, digital data consists of digits or numbers. Internally, digital electronic technology represents data as binary signals (bits) that are either on or off. This binary representation allows a high level of flexibility and accuracy in the representation and processing of data.
For historical reasons, bits are clumped into groups of eight that are called bytes. If you run through all the possible combinations of eight bits, you will find that a byte can have 256 different values (numbers 0 - 255). This is enough for each byte to represent a single character in most languages, so a five-character word like Hello requires five bytes to store.
To improve speed, modern computers process multiple bytes at one time as words. Although mobile devices and older computers use 32-bit words (four bytes), most contemporary laptops and desktops use 64-bit words (eight bytes).
The amount of storage in a computer or storage device is usually measured by the number of bytes that it can store. Because storage devices can store trillions or quadrillions of bytes, Greek prefixes are used to make referring to numbers of bytes easier. However, because this is digital data, powers of two are used, making the decimal numbers look a bit sloppy
- One kilobyte (KB) = 210 bytes = 1,024 bytes
- One megabyte (MB) = 220 bytes = 1,048,576 bytes = 1,024 KB
- One gigabyte (MB) = 230 bytes = 1,073,741,824 bytes = 1,024 MB
- One terabyte (MB) = 240 bytes = 1,099,511,627,776 bytes = 1,024 GB
Physical Storage Media
Digital data is stored on a variety of physical media, depending on how quickly the data needs to be accessed, how much data needs to be stored, and whether the data needs to continue to exist when the digital device is turned off or rebooted.
- Random access memory (RAM) is made with silicon transistors to quickly store and access data that is being actively used. RAM is fast but more expensive than other forms of memory, and the data is lost when the device is turned off or rebooted
- Magnetic hard disks are spinning platters coated with magnetic material that stores data in magnetic patterns on the disk. Hard drives can store very large amounts of data (in the terabytes), but this data takes longer to access than RAM. Hard drives are a reliable, established technology. Data on a hard drive remains even after the hard drive is powered down, but hard drives do not last forever and will eventually fail, often taking their data with them
- Flash memory is made with transistors like RAM, but built with a special structure (floating-gate MOSFET) that allows the data to persist even if the power is turned off. Flash memory has become ubiquitous in consumer devices (SD cards, thumb drives, smartphones, etc) because it has high capacity and has become inexpensive over the past decade. Flash memory is slowly replacing magnetic hard disks with solid-state drives that are faster and use less power. However, flash memory is limited in the number of times it can be written to, so solid-state drives do not last as long as magnetic hard drives and are prone to unexpected failures
- Optical disks as compact disks (CDs) and digital versatile disks (DVDs) store bits as indentations in aluminum or chemical films that are then encased in plastic disks. Optical disks have high capacity and are inexpensive to manufacture in bulk. However, they are generally used only for data that will not change for extended periods of time, and they are commonly used to archive and backup data from magnetic and flash drives. It is uncertain how long data on a CD or DVD can be expected to last, and optical disks are rapidly becoming obsolete
- Magnetic floppy disks store data in a similar manner to magnetic hard disks, except on a removable plastic disk nestled in a protective case. You may occasionally encounter old data stored on floppy disks, although this technology is obsolete and unreliable. You should migrate any important data off these disks and onto a hard drive as soon as possible so the data is not lost to physical degradation
- Magnetic tape is a roll of plastic film coated with a magnetic material and used to store bits in a similar way as magnetic hard drives. Although tape is one of the oldest technologies for storing digital data, tape drives are still used to back up hard drives for long-term storage
Considerations When Choosing Storage Formats and Platforms
A number of factors need to be considered when choosing the appropriate storage hardware and formats for a project. Those needs are driven by the organizational size and mission: What are you ultimately trying to accomplish with the data?
- Number of readers
- How many people need to access the data?
- How quickly do they need access to the data?
- Number of editors
- How many people capture, process and maintain the data?
- Will multiple be working on the data at the same time?
- Frequency of change:
- How often is the data changed?
- How quickly do changes need to be available to users?
- Volume and types of data:
- How much data exists?
- How much data will exist?
- How many different types of data need to be kept together?
- How will needs grow or shrink over time?
- Access security:
- Who needs access to the data?
- Who should be kept out of the data?
- Do federal or state regulations require restricting access to the data?
- How do the costs of a security breach balance against the costs of security?
- Availability security:
- What would happen if this data were lost or destroyed?
- Who will perform backups?
- Does this data need to survive this project?
- Cost:
- Will this be compatible with existing processes?
- What are the set-up and maintenance costs for storage?
- What can we afford in terms of both capital investment and manpower?
- Do managers or co-workers have a preconceived bias against a technology?