GPX in ArcGIS Pro
Rev. 8 September 2024
GPS Exchange Format (GPX) is a widely-used file format used to store and share GPS data. Many GPS-enabled devices store tracking information in GPX files.
Outdoor athletes (runners, hikers, cyclists) can find recording and analysis of tracking data especially useful assessing performance in fitness activities.
Commercially, this moves into the realm of telematics, where delivery or logistics companies like UPS or Amazon can use analysis of vehicle tracking data to improve inefficient processes (or employees), reduce costs, and increase profits.
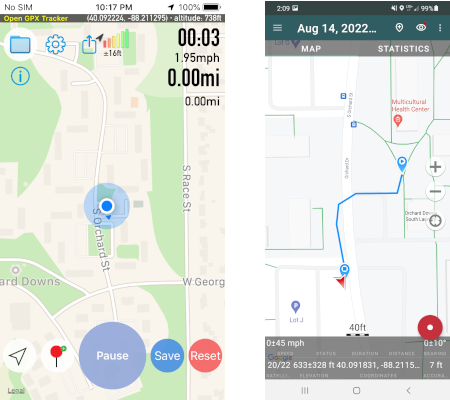
Smartphone Apps
There are a variety of free smartphone apps that can be used to capture and map tracking data, although not all apps provide the capability to download GPX files. Some notable ones with download capability include:
- Android:
- iPhone:
GPX FIles
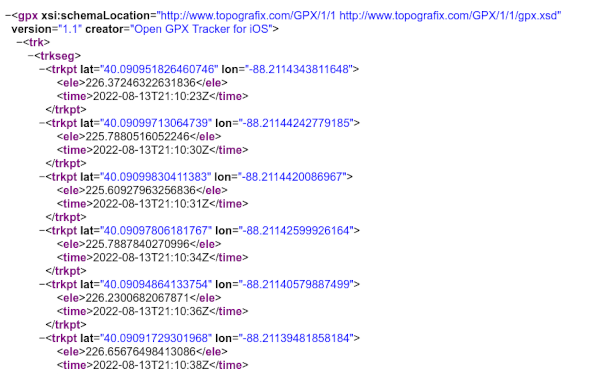
The "X" in GPX also alludes to eXtensible Markup Language (XML), which is a general data storage format commonly used by a variety of software. The format is human-readable, although some expertise is needed to interpret the contents of an XML-based file.
Waypoints
Although GPX files can contain a variety of different types of data, the data of primary interest is usually a sequence of waypoints, which are GPS latitude/longitude locations that are regularly captured by the tracking app as it records.
Waypoints also commonly include the date and time when they were recorded and an elevation supplied by GPS.
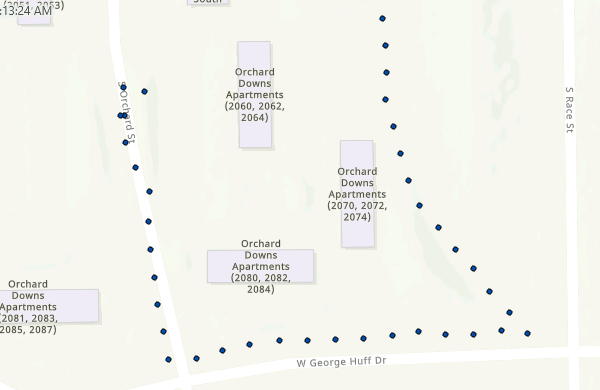
The approximate paths of travel can be connecting the waypoints with lines. Speed can be estimated based on the distance between waypoints divided by the difference in time between waypoints.
Units
GPX uses the WGS 1984 coordinate system used by the GPS system for latitude and longitude in degrees. ArcGIS Pro will map WGS 1984 data as unprojected latitude and longitude by default. Because unprojected WGS 1984 distorts width the further north you go from the equator, and you will probably want to change the map projection to something more cartographically appropriate, like a Mercator or state plane coordinate system.
The elevation field in the GPX file will probably be the height in meters above the WGS 84 ellipsoid, which is what is provided in the GPS signal used to create the waypoints.
Note that depending on where you are in the world, this may be different from the elevation specified by national geological agencies. In the US, elevations published by USGS are commonly specified as feet above mean sea level, which may be slightly different from the GPS elevations (ESRI 2003).
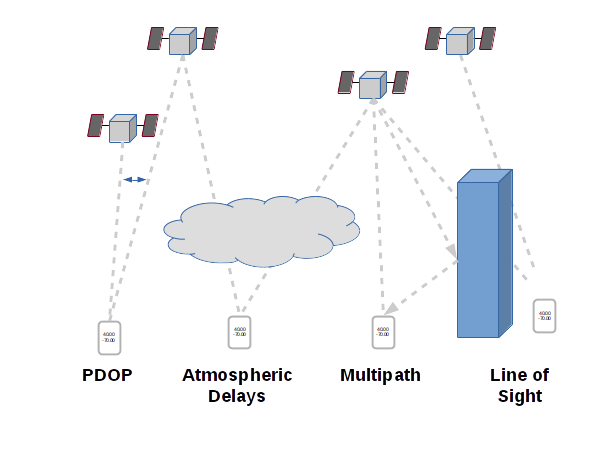
Elevation data is also subject to the same sources of error and error fluctuation as GPS latitudes and longitudes. Elevation readings are commonly off by as much as +/- 400 feet (Garmin 2022).
Alternative File Formats
There are often other file formats that tracking apps may offer as download options. Unless you have a specific need to use one of these, you should probably stick to GPX, since these alternative formats may store the tracking data in nonstandard ways that (depending on your task) may require manual data cleaning or manipulation to use.
- Comma-separated variable (CSV) is a table format that can be used when you want to bring your tracking data into a spreadsheet program like Excel.
- Keyhole Markup Language (KML) is a geospatial data format used by Google Maps, and may be a preferred format if all you want to do is map your tracking data on a web map.
- KMZ is a compressed form of KML that can also be used with Google Maps, but uses smaller file sizes that may be helpful with a large number of waypoints.
Mapping in ArcGIS Pro
GPX files can be imported into new feature classes using the GPX to Features tool.
- If you are starting a new project, create one with a new Map.
- Under Analysis, Tools, open the GPX to Features tool.
- Open the Input GPX File.
- Add a name for the Output Feature class that will be saved in the project geodatabase.
- For the Output Type indicate whether you want to map the waypoints as Points.
- If you also want to have line connecting the points, under Analysis, Tools, open the Points to Line tool.
- The Input Features should be your waypoints feature class.
- Provide a meaningful name for the Output Feature Class.
- You can leave the Line Field and Sort Field blank since the line will be constructed in the chronological order of the points in the feature class.
- Choose an appropriate coordinate system, since mapping unprojected latitudes and longitudes is considered poor cartographic technique because widths are stretched relative to height as you move north or south of the Equator.
- Right click on the map in the Drawing Order and select Properties.
- Under Coordinate Systems, select Web Mercator, which is a projection commonly used on web maps.
- Adjust the point and line Symbology as desired. For the points we symbolize by Elevation.
Publish to a Web Map
You can share your data as an interactive map in ArcGIS Online.
- Right click on the point layer and select Sharing, Share as Web Layer.
- Provide a meaningful Name, which you can copy into the required Summary and Tags.
- Layer Type is feature.
- Share with Everyone unless you have a need to restrict access to this data to specific groups.
- Analyze
- If you get a warning that, Unique numeric IDs are not assigned, right click on ellipsis (...) beside the message and check Allow assignment of unique numeric IDs for sharing web layers.
- Publish
- In ArcGIS Online, open the new layer in Map Viewer, symbolize as needed, and Save to update the default feature service symbology.
Statistics
Track Distance
You can get the distance of the line created from the waypoints with the Calculate Geometry tool.
- View the Attribute Table for the track line.
- Add a field of type float and give it a meaningful name (Distance Feet).
- Close the fields view to accept the changes.
- Right click the new field and select Calculate Geometry.
- For the property, select Length (geodesic).
- For the Length Unit select the desired unit (International Feet).
- The distance of the line will be displayed in the new attribute.
Elapsed Time
- In the Contents pane, right click on the waypoint layer and select Data Engineering.
- Drag the DateTime field into the display and select Calculate.
- View the Range to get the elapsed time.
Elevation Distribution
To get a histogram of the distribution of elevations on your track, including mean and standard deviation:
- In the Contents pane, select the waypoint layer.
- In the Data ribbon, select Visualize, Create Chart, Histogram.
- For Numeric Fields select the elevation field (Elevation)
Gradient Chart
Changes in elevation (slope or grade) are significant for outdoor athletes since moving uphill to a higher elevation requires a greater expenditure of energy and can reduce speed.
Changes in elevation are also important for large freight vehicles as especially steep grades can be difficult to negotiate both in climbing uphill and braking downhill.
A gradient chart can be used to show the changes in elevation along the track.
- In the Contents pane, select the waypoint layer.
- In the Data ribbon, select Visualize, Create Chart, Line Chart.
- For Date or Number select the time field (DateTime)
- For Numeric Fields select the elevation field (Elevation)
Speed
If your GPX file does not contain a speed field, you can use a Python script with ArcPy to calculate speed using distances between successive waypoints and differences in time.
import arcpy

# Specify the waypoint feature class

points = "Meadowbrook_Points"


# Add the speed field if it doesn't already exist

if len(arcpy.ListFields(points, "Speed")) == 0:
        arcpy.management.AddField(points, "Speed", "FLOAT")


# Create a cursor to scan the waypoints

cursor = arcpy.da.UpdateCursor(points, ["SHAPE@X", "SHAPE@Y", "DateTime", "Speed"])


# Track the previous waypoint to calculate distance and time from the prior waypoint.

prior_waypoint = None


# Loop through each waypoint

for waypoint in cursor:

        if prior_waypoint == None:
            prior_waypoint = waypoint
            continue


	# Calculate the distance since the prior waypoint using a line segment

        wgs84 = arcpy.SpatialReference(4326)

        start_point = arcpy.Point(prior_waypoint[0], prior_waypoint[1])

        end_point = arcpy.Point(waypoint[0], waypoint[1])

        segment = arcpy.Polyline(arcpy.Array([start_point, end_point]), wgs84)

        distance = segment.getLength("GEODESIC", "METERS")


	# Calculate the time since the prior waypoint for speed = distance / time

        timechange = waypoint[2] - prior_waypoint[2];

        speed = 0

        if timechange.seconds > 0:
                speed = distance * 0.000621371 * 3600 / timechange.seconds


	# Update the waypoint speed field

        waypoint[3] = speed

        cursor.updateRow(waypoint)


	# This waypoint will be the prior waypoint in the next loop interation

        prior_waypoint = waypoint


# Delete the cursor to write the features and free any editing locks.

del cursor
We can insert this code into a notebook and run it to create the new layer.
- In the Analysis ribbon, select Python, New Notebook.
- After you run your script to add the new field, a bug in the software will cause the existing elevation point layer to disappear. Re-add it.
- In the Catalog Pane, duplicate your elevation map, give the copied map a meaningful name (Speed Map).
- Rename the elevation map (Elevation Map) and notebook (Speed Notebook) to keep everything clearly labeled.
- Symbolize the map by the new speed attribute.
- Data, Visualize, Create Chart, and Line Chart to create a chart of speed over time.
- Data, Visualize, Create Chart, and Histogram to analyze the distribution of speeds with the mean, median, and standard deviations.
Infographic
All of this information can be placed on an infographic.
- Insert, Layout
- Add the elevation and speed maps.
- Zoom and pan the maps identically (1:17,000)
- Remove the base map service credits.
- Add and format the legends.
- Add and format the charts.
- Add a title.
- Add credits.
Animation
ArcGIS Pro has the capability to create animations of data that has a time information (time-enabled data) which you can export to files for upload to websites or video sites like YouTube.
Time-Enable the Layer
Your waypoint date and time information will probably come in as the DateTime field.
- Right click the waypoint layer, select Properties and Time.
- Under Layer Time, select Each feature has a single time field. This should populate the rest of the dialog with the DateTime field information.
- Under the Map tab, adjust the time slider parameters.
- Under the Current Time group, set the Span to an interval so at least one waypoint is displayed in each interval.
- Smaller values will increase smoothness, but may result in gaps if you have missing data or infrequent sampling.
- The appropriate value will depend on the frequency of your waypoint sampling and how many features you wish to display at one time.
- For these points regularly collected every second, five seconds will give a good balance between temporal resolution and missing data.
- In the Step group, select the Step Interval with the same value as the Span.
- In the Snapping group, enable Time Snapping.
- Slide the time slider to examine the feature display along the timeline.
Configure the Animation
- Zoom your map so that the whole path is visible.
- Under the Animation tab and Create group, select Import and Time Slider Steps to create keyframes for each step in the time slider.
- In the Playback group, change the animation Duration to length appropriate for the attention span of your audience. Twenty seconds should be suitable for a track of this length.
- Move immediately to the next export step without viewing the keyframes. The animation tool is buggy and previewing may cause dropped frames in your exported video.
Under the View tab and Animation group, select Add.
Export the Video
- Under Export, click Movie and export to an HD720 file.
- Give an appropriate File Name and path.
- Under File Export Settings you may consider reducing the Frames per Second to 15 to reduce the file size and export time. With the highly compressed time used in this animation, higher frame rates may not gain you much smoothness in your video.
- Export. Depending on your settings, and the number of points, this may take a few minutes. The approximate remaining time will be given in the dialog.
- Check the video file. By default, the file will be saved in the ArcGIS Pro documents Media folder.
Real-Time Tracking
GPX files are snapshots of past activities. However, there are situations where you might want to have real-time information about where someone or something is, such as keeping track of where your children are.
ArcGIS Field Maps is an app that helps "mobile workers perform data collection and editing, find assets and information, and report their real-time location.s"
You can create ArcGIS Online maps with location sharing and observer where people using that map are located.

Appendix: Speed Script Components
Conditional Field Addition
You can use ListFields() to see if a field already exists before AddField().
- The second parameter to ListFields() is an optional name to search for. If a field with that name doesn't exist, it returns an empty list with a len() of zero.
- If the field isn't found, addField the new field. The second parameter is the data type for the field.
This example from the speed script above checks for the existence of the Speed parameter (perhaps from a prior execution of the script) before adding the field.
if len(arcpy.ListFields(points, "Speed")) == 0:
        arcpy.management.AddField(points, "Speed", "FLOAT")
The existence check may not be necessary since AddField() seems to fail silently if the field already exists.
For Loops
for loops are used to iterate through collections of objects.
Iterators are collections of objects. Iterators can be simple Python lists, or objects that return successive values (like the cursors used above).
Python uses indentation to define blocks of code that are controlled by statements like if or for. All code below the for statement is indentented to indicate that it is in the block of code that should be executed in each loop of the for statement.
In this example, this for loop iterates through the values in a list and prints them.
for x in [1, 3, 5, 7]:

	print(x)
Output:
1
3
5
7
Cursors
In ArcPy, a cursor is a Python iterator that can be used in a for loop to step through the features in a feature class.
There are three types of cursors that are created with the following constructors:
- SearchCursor() should be used when iterating through values but not changing anything.
- UpdateCursor() should be used when iterating through features and updating values. This is the cursor used in the speed script above.
- InsertCursor() should be used when adding new features to a feature class.
The parameters to the cursor constructors are the same.
- The first parameter to the constructor is the name of the feature class affected by the cursor.
- The second parameter is a list of attributes that are associates with each cursor iteration.
- There are special attribute names that begin with SHAPE@ that set or return geometric properties for the features.
After the conclusion of the for loop, you should del the cursor to commit any changes to the feature class and free up any sharing locks.
In this example, this search cursor iterates over the waypoints in the GPX feature class used above and prints the DateTime for each waypoint.
points = "Meadowbrook_Points"

cursor = arcpy.da.SearchCursor(points, ["DateTime"])

for waypoint in cursor:

	print(waypoint[0])

del cursor
Distance
To calculate the distance between points, you need to create Point() objects for both points, construct a Polyline() between the two points, and getLength() for the polyline segment.
In the example below,
- We have to include the spatialReference in the Polyline() so we can calculate length below. 4326 is the WKID for WGS 84 lat/long.
- GEODESIC distance is the straight line distance between two points, compensating for the curvature of the earth.
- We ask for the distance in METERS.
- Note that the parameters to Point() are x/y, which are longitude/latitude in geographical terms.
start_lat = 40.109081594512006

start_long = -88.22720031510285

end_lat = 40.10616484494814

end_long = -88.2271889482995

wgs84 = arcpy.SpatialReference(4326)

start_point = arcpy.Point(start_long, start_lat)

end_point = arcpy.Point(end_long, end_lat)

segment = arcpy.Polyline(arcpy.Array([start_point, end_point]), wgs84)

distance = segment.getLength("GEODESIC", "METERS")

print(distance)
Time Calculations
Dates and times in feature classes are returned as Python datetime objects. Use of these objects permits easier decomposition of date and time into components (like months, minutes, or seconds) and also facilitates calculations using timedelta objects.
In this example, we calculate the distance between two times.
start_time = datetime.datetime.strptime("2022-08-13 21:18:12", "%Y-%m-%d %H:%M:%S")

end_time = datetime.datetime.strptime("2022-08-13 21:40:05", "%Y-%m-%d %H:%M:%S")

print(start_time)

print(end_time)

difference = end_time - start_time

print(difference.seconds)
Appendix: Merging Files with ArcPy
If you have multiple GPX files that you want to import into a single feature class, this ArcPY script will read all GPX files in the gpx_directory and combine them in a feature class specified in the output variable.
import os

import arcpy

aprx = arcpy.mp.ArcGISProject('current')

gpx_directory = "U:/Downloads"

output = aprx.defaultGeodatabase + "/gpx_points"

filecount = 0

for filename in os.listdir(gpx_directory):
	if ".gpx" not in filename:
		continue

	filepath = gpx_directory + "/" + filename

	filecount = filecount + 1

	if filecount == 1:
		arcpy.conversion.GPXtoFeatures(filepath, output)
		continue

	memory_features = "memory/temp"

	arcpy.conversion.GPXtoFeatures(filepath, memory_features)

	arcpy.management.Append(memory_features, output)

	arcpy.management.Delete(memory_features)
Appendix: Line Segments
An alternative to adding a speed field to the waypoints feature class is creating a separate feature class of line segments between waypoints.
# Parameters

points = "Meadowbrook_Points"

segments = "Meadowbrook_Segments"


# Create the line segment feature class.

wgs84 = arcpy.SpatialReference(4326)

arcpy.management.CreateFeatureclass("", segments, "Polyline", "", "", "", wgs84)


# Add the fields.

arcpy.management.AddField(segments, "DateTime", "DATE")

arcpy.management.AddField(segments, "Elevation", "FLOAT")

arcpy.management.AddField(segments, "Distance", "FLOAT")

arcpy.management.AddField(segments, "Speed", "FLOAT")


# Create the cursor to scan the waypoints

incursor = arcpy.da.SearchCursor(points, \
            ["SHAPE@X", "SHAPE@Y", "Elevation", "DateTime"])


# Create the cursor to add the segments

outcursor = arcpy.da.InsertCursor(segments, \
            ["SHAPE@", "DateTime", "Elevation", "Distance", "Speed"])

# Tracking variables for the loop

prior_waypoint = None

totaldistance = 0

for waypoint in incursor:

	# Since lines are between points, keep track of the prior point

	if prior_waypoint == None:
		prior_waypoint = waypoint
		continue


	# Create the line segment

	startpoint = arcpy.Point(prior_waypoint[0], prior_waypoint[1])

	endpoint = arcpy.Point(waypoint[0], waypoint[1])

	segment = arcpy.Polyline(arcpy.Array([startpoint, endpoint]), wgs84)


	# Calculate the distance covered by the line segment

	distance = segment.getLength("GEODESIC", "METERS")

	totaldistance = totaldistance + distance


	# Calculate the time difference to calculate speed

	timechange = waypoint[3] - prior_waypoint[3];

	speed = 0

	if timechange.seconds > 0:
		speed = distance * 0.000621371 * 60 * 60 / timechange.seconds


	# Add the new line segment

	outcursor.insertRow([segment, waypoint[3], waypoint[2], totaldistance, speed])

	prior_waypoint = waypoint


# Delete your cursors to write your new features and release the sharing locks.

del incursor

del outcursor