Geocoding in ArcGIS Pro
Geocoding is the process of converting text descriptions of locations like place names or street addresses into Cartesian points, lines, or polygons that can be mapped and analyzed in GIS.
ArcGIS Online and ArcGIS Enterprise provide geocoding services that are suitable for most geocoding tasks. However, there are costs and limitations to geocoding services that must be considered when deciding how to handle geocoding errors and when determining if alternative geocoding methods are needed.
This tutorial will introduce geocoding in ArcGIS Pro and methods for dealing with the limitations of geocoding.
Geocoding Problems
Geocoding is an imperfect process that can result in geocoding errors like missing locations or location that are in the wrong place.
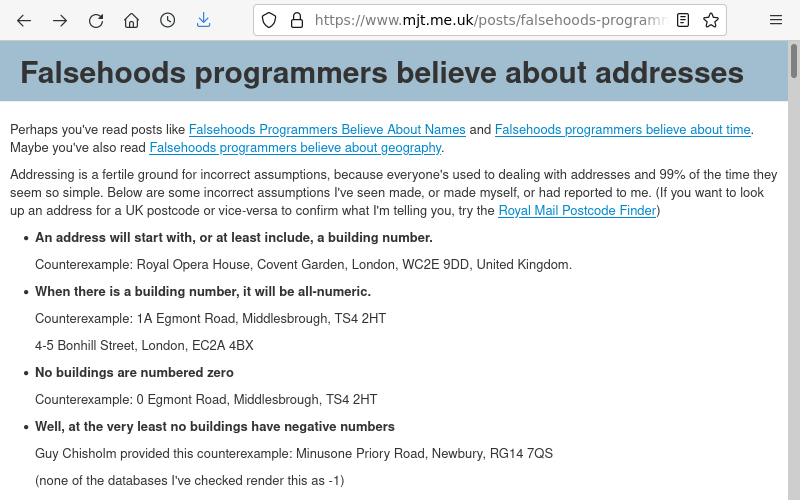
With street addresses, street names present a special challenge. Some typical issues include
- Street names often have multiple methods of abbreviation (N 6th St. vs North Sixth St. vs. North 6 Street)
- Street names are easy to misspell, especially when streets have unconventional spellings of common words.
- Street can have multiple names, including colloquial or honorary names (Avenue of the Americas vs. Sixth Avenue)
- Street numbering practices vary around the world and even across communities in the USA.
- Geocoders usually return single lat/long coordinates that may not represent meaningful locations when geocoding large areas represented with polygons (like office buildings or industrial sites).
Manual Geocoding
The examples in this tutorial use a collection of locations (including invalid addresses) in Champaign-Urbana, Illinois, USA that were collected using Google Maps.
If you have a small number of points, the easiest approach to accurate geocoding may be simply to get lat/long locations from Google Maps and add them as columns in your data in a spreadsheet program.
You can then export the spreadsheet to a CSV file and import it into ArcGIS Pro from Map, Add Data, XY Point Data to run the XY Table to Point tool.
Geocoding Service
Geocoding services provide internet access to servers that use large location databases and sophisticated algorithms to identify addresses and place names in order to return lat/long coordinates for those locations. There are a variety of geocoding services, with Google's geocoding service incorporated into Google Maps search probably being the most prominent.
The easiest and (often) most accurate way to geocode addresses or place names in ArcGIS Pro is using the ArcGIS World Geocoding Service, which is available using the Geocode Addresses tool.
- The tool reads addresses from the Input Table.
- The tool sends geocoding requests to the server for those addresses.
- The server uses its algorithms and databases to find lat/long locations for those addresses.
- The server responds to ArcGIS Pro with the lat/long locations.
- The tool copies those lat/long responses into a new feature class in the project geodatabase.
- The data from the feature class is added to the map for rendering.
The major downside to the ArcGIS World Geocoding Service is that there is a small charge in credits for each geocoding operation, and those charges can be substantial when you have a task that requires geocoding thousands of addresses.
- If your organization has an ArcGIS Enterprise server, ArcGIS World Geocoder is a product that can be installed on ArcGIS Enterprise and used to keep geocoding in house, thus avoiding the cost and exposure associated with using a public geocoding service.
- Also, the ArcGIS World Geocoding Service is a public service that should not be used with confidential data.
To geocode a CSV file:
- Under the Analysis tab and Toolbox, find the Geocode Addresses tool.
- For Input Table, select the CSV file.
- For Input Address Locator, use the ArcGIS World Geocoding Service.
- For Input Address Fields, select Multiple Field and the appropriate address fields from your CSV file. If you use standard column names like Address or City, the tool should automatically select those fields.
- For Output Feature Class, give a name for the new feature class in the project geodatabase.
- For Country select the appropriate country (United States).
- For Preferred Location Type, select Address location and the appropriate subcategory Street Address.
Reverse Geocoding
Reverse geocoding is the process of converting lat/long coordinates to street addresses and / or location names.
The ArcGIS World Geocoding Service supports reverse geocoding using the Reverse Geocode tool in ArcGIS Pro.
- For Input Feature Class or Layer, select the layer of points (Google_Maps).
- For Input Address Locator, use the ArcGIS World Geocoding Service.
- For Output Feature Class, give a name for the new feature class in the project geodatabase.
- Select the Feature Type that you would like returned.
- Right click on the layer and view the Attribute Table to see the returned values.
Street Address Locator
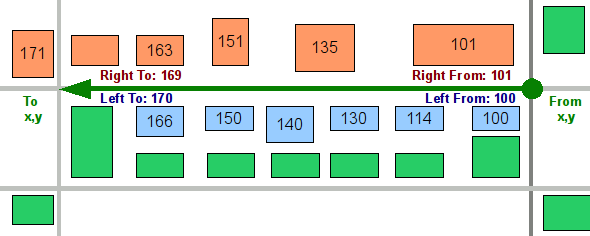
An older geocoding technique involves the use of custom street address locators created from datasets that use street segments with names and address ranges to estimate street address locations.
Geocoding services are generally preferred to street address locators because street address locators often mismatch or fail to match street names, and because locations interpolated from building number ranges can have significant deviation from reality.
A street address locator may be the appropriate solution if you are geocoding a large number of addresses where service cost would be an issue, or if you are geocoding confidential data, such as the home addresses of participants in medical research.
Download Centerlines
Street centerline data used for creating custom locators needs features and attributes indicating the range of addresses associated with each street segment.
For each feature you are geocoding:
- The geocoder breaks each address down into street number and street name components.
- The geocoder does a fuzzy search through the locator to find street segments that match the street name.
- The geocoder further selects the segment whose street number range contains the address street number.
- The geocoder selects the side of the segment whose street number range contains the address street number.
- The geocoder interpolates the location on the street segment based on where the address street number sits in the range of possible street numbers associated with that segment.
One source for suitable centerline shapefiles includes the US Census Bureau's TIGER/Line Lines shapefiles. Some cities also maintain street centerline files, such as the New York City Department of City Planning's LION files.
Create Locator
- Unzip the centerline file.
- Add the shapefile to a map.Under Analysis and Toolbox, find the Create Locator tool.
- Select the centerlines as the Primary Table with a Role of Street Address.
- For the TIGER shapefile, the following fields are appropriate:
- Feature ID: FID
- Left House Number From: LFROMADD
- Left House Number To: LTOADD
- Right House Number From: RFROMADD
- Right House Number To: RTOADD
- Street Name: FULLNAME
- Left ZIP: ZIPL
- Right Zip: ZIPR
- Language Code: English
- Select a location for the Output Locator in the project geodatabase (Champaign).
- Note that this tool will flag the locator as invalid or fail with ERROR 002777 if the path to your project is a network path to a folder on a network drive.
- If your network drive is also mounted with a letter name, that path should work.
- The tool may also throw warnings about rows with missing data, and you can ignore those unless you are working with a centerline file you created yourself and such errors may reflect deficiencies in your data.
Centerline Geocode
Under Analysis and Toolbox, find the Geocode Addresses tool.
- Input Table: Your CSV file of addresses
- Input Address Locator: The custom locator created above (Champaign)
- Input Address Fields: Select only the fields that have corresponding fields in the locator (Address). Deselect City and State since there are no city or state fields in the locator, and selection will cause the geocoder to find zero points.
- Output Feature Class: Select a meaningful name (Custom_Locator)
- Category: Address and Street Address
Nominatim
There are a variety of additional commercial and open geocoding services available beyond those provided by ESRI and Google Maps. However, since ArcGIS Pro does not contain a native tool for using other services, you will need to use an ArcPy script if you want to access them.
Nominatim (from the Latin, "by name") is an open geocoding service that can be used to search OpenStreetMap data by name and address (geocoding) and to generate synthetic addresses of OSM points (reverse geocoding) (Nominatim 2022).
Nominatim may be useful if you wish to save the expense of using a commercial geocoder, and either you are geocoding place names, or you are geocoding street addresses in an area where you do not have access to data for a custom street address locator.
While Nominatim is free to use, it is a community-developed and supported service that can be less accurate than commercial geocoding services, and since it is not designed for or intended for bulk geocoding, it has significant volume and speed limitations. Be aware of the Nominatim usage policies.
Nominatim API search requests are URLs in the following form:
https://nominatim.openstreetmap.org/search?<params>
There are a variety of specific parameters available, but the most straightforward search involves a free-form query (q=<query>) with an output format (format=geojson).
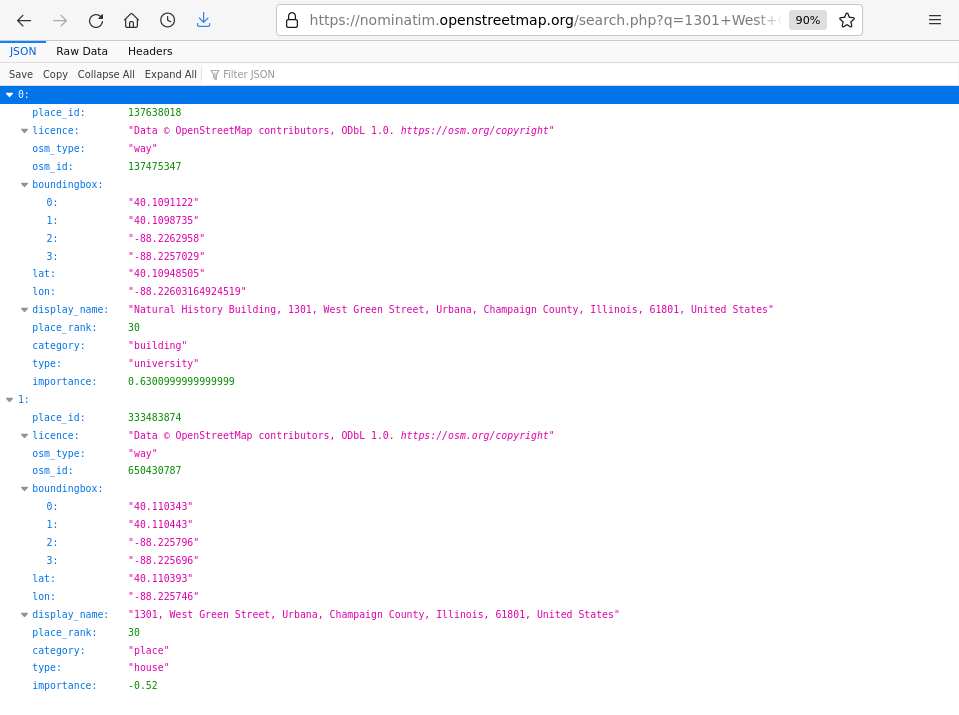
For example, to make an API request to find the lat/long for 1301 W. Green St. Urbana, IL, you can use the following URL.
Note that the query string has spaces replaced with plus signs (+) and an ampersand (&) between the query string and the format parameter.
https://nominatim.openstreetmap.org/search?q=1301+West+Green+Street+Urbana+Illinois+USA&format=json
Nominatim returns the results as JSON, which a browser will display in a readable form.
import csv
import json
import arcpy
import urllib.request

# Parameters

csv_filename = 'U:\\Downloads\\addresses.csv'

query_columns = ['Address', 'City', 'State']

output_feature_class = 'Nominatim'


# Read the header from the CSV file

csv_file = open(csv_filename, newline='')

csv_reader = csv.reader(csv_file, delimiter = ',')

csv_header = next(csv_reader)


# Create the new feature class and add the fields

wgs84 = arcpy.SpatialReference(4326)

if not arcpy.Exists(output_feature_class):
	arcpy.management.CreateFeatureclass("", output_feature_class, "Point", "", "", "", wgs84)

	for fieldname in csv_header:
		arcpy.management.AddField(output_feature_class, fieldname, "TEXT")


# Create the insert cursor and loop though the file

cursor_fields = csv_header

cursor_fields.append('SHAPE@X')

cursor_fields.append('SHAPE@Y')

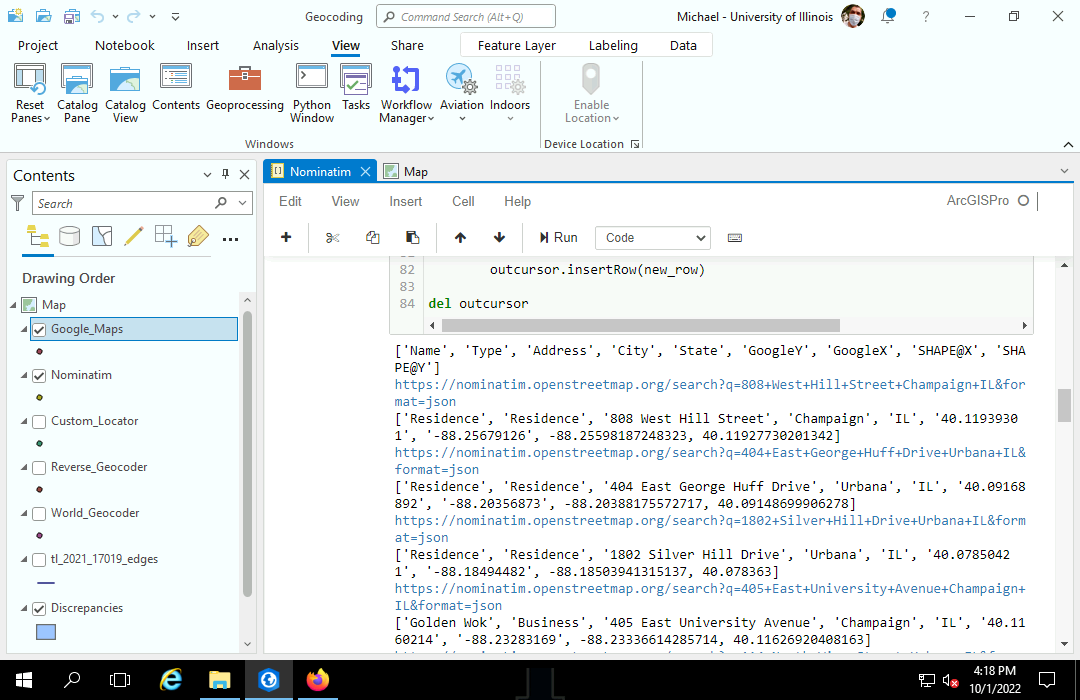
print(cursor_fields)

outcursor = arcpy.da.InsertCursor(output_feature_class, cursor_fields)


# Rewind the file and use a dictionary reader to loop through the file

csv_file.seek(0)

csv_reader = csv.DictReader(csv_file, delimiter=',', quotechar='|')


for row in csv_reader:

	# Create the query

	query = '+'.join(str(row[key]) for key in query_columns)

	query = query.replace(' ', '+')

	endpoint = 'https://nominatim.openstreetmap.org/search?'

	url = endpoint + 'q=' + query + '&format=json'

	print(url)


	# Send the query to the Nominatim API and parse the returned JSON

	user_agent = "Mozilla/5.0 (Macintosh; Intel Mac OS X 10_9_3)"

	request = urllib.request.Request(url, headers={'User-Agent': user_agent})

	json_string = urllib.request.urlopen(request).read()

	results = json.loads(json_string.decode("utf-8"))

	if len(results) <= 0:
		continue;


	# Append the long/lat to the attributes and insert the new point feature

	new_row = list(row.values())

	new_row.append(float(results[0]['lon']))

	new_row.append(float(results[0]['lat']))

	print(new_row)

	outcursor.insertRow(new_row)

del outcursor
Security Certificate Error
If you get a URLError SSL: CERTIFICATE_VERIFY_FAILED message, this is caused by outdated security certificates in your Python installation.
The formal way to fix this problem is to update the certificates in your Python installation. However, that is difficult with this special installation for ArcGIS Pro.
One way around this issue is to replace the urlopen() code above with a variant that uses a context to ignore security certificates
import ssl

request_context = ssl.create_default_context()

request_context.check_hostname = False

request_context.verify_mode = ssl.CERT_NONE

user_agent = "Mozilla/5.0 (Macintosh; Intel Mac OS X 10_9_3)"

request = urllib.request.Request(url, headers={'User-Agent': user_agent})

json_string = urllib.request.urlopen(request, context=request_context).read()
BOM Error
If your diagnostic display of heading names contain junk characters before your first field, you probably saved your CSV file as UTF-8 with BOM (byte order mark) characters at the beginning of the file.

This will likely happen when saving a CSV from Excel on Mac computers with the UTF-8 character set that can represent characters beyond the standard English ASCII letters, numbers, and punctuation marks.
There are two options for addressing this issue.
- Add an encoding to the open() function that indicates that
the file is in UTF-8 and that if it begins with a BOM, it should not be
included in the data read from the file.
csv_file = open(csv_filename, newline='', encoding='utf_8_sig')
- Reopen the file in Excel and save as a plain text CSV file.
Analysis
There are three factors you should consider in assessing the quality of geocoding (Precisely 2022):
- Match rate: What percentage of locations are correctly identified by the geocoder?
- Positional accuracy: How close are the geocoded locations to the desired physical locations?
- Metadata: How much diagnostic data does the geocoder provide for assessing the validity of locations?
Match Rate
You can validate the match rate of the geocoder by viewing the attribute table for the geocoded points.
- The total number of locations will appear under the table.
- Ungeocoded rows will still appear in the table, but will have no geospatial data or Loc_name field indicating the type of location found by the geocoder.
- If you have too many ungeocoded points to count manually, you can right click on the loc_name field and select Statistics to show a bar chart with the count of locations by location name.
- The geocoder with the fewest number of ungeocoded points has the best match rate.
- In this case with invalid addresses, you might also consider the number of invalid addresses that the geocoder matched to erroneous locations.
Positional Accuracy
Desire lines are an analysis tool that draws lines between related points in different layers. In business analyst, this tool is used to visualize the spatial relationships between stores and the customers of those stores.
Desire line can be used to analyze positional accuracy of a geocoder by finding the distances between reference points and the geocoded points.
The geocoder with the lowest median distance between reference points and geocoded points has the best positional accuracy.
- Under Analysis, Tools, find the Generate Desire Lines tool.
- Store Layer: use the Google Maps address points.
- Customer Layer: use the output of one of the geocoders.
- Output Feature Class: provide a meaningful name.
- Store ID Field: The address field from Google Maps.
- Associated Store ID Field: The address field from the geocoder output layer.
- Distance Type: Straight Line (the default)
- Measure Units: Meters
- Symbolize the lines so they are visible over the base map.
- Select the desire lines layer in the Contents pane, then under the Data ribbon, choose Visualize, Create Chart, Histogram to show the distribution of
- Add the Median line to find the median amount of deviation. Median will likely be preferred over mean since the distribution of values is often skewed.
- If you have ungeoreferenced points, those distances will be -1 and may affect your median. Add a Definition Query to filter those out.
Infographic
You can present your analysis results in a summative infographic.
In this case, the two geocoders have very similar positional accuracies. The big difference is in match rate. The ESRI World Geocoder matches all valid points, but does mismatch an invalid address. The street geocoder is more conservative with a lower match rate, but that conservatism avoids mismatching any invalid addresses. So the trade-off seems to be match rate completeness vs. accuracy.
- Create a 11" x 8.5" landscape orientation layout and give it a meaningful name.
- Add neat lines and marginalia.
- Add a map frame of the reference and geocoded points.
- Remove the service credits
- Add a map zoomed in on an area with notably wide deviations between the different geocoders.<7/li>
- Add the histograms.
- Add analysis results.
- Add a legend.
Analysis with ArcPY
The manual analysis performed above can also be performed using an ArcPy script.
Deviation Lines
Given the four geocoders used above, we can use an ArcPy notebook script to create hub-and-spoke lines to visualize and analyze the deviations (in geodesic meters) between a particular standard (in this case, the locations manually geocoded with Google Maps) and the locations returned by the other three geocoders.
# Parameters

hub_feature_class = "Google_Maps"

search_feature_classes = {"World_Geocoder": "USER_Address",
                          "Custom_Locator": "USER_Address",
                          "Nominatim": "Address"}
key_field = "Address"

distance_field = "Distance"

geocoder_field = "Geocoder"

spoke_feature_class = "Deviation"


# Create the spoke lines feature class and cursor

wgs84 = arcpy.SpatialReference(4326)

arcpy.management.CreateFeatureclass("", spoke_feature_class,
                                    "POLYLINE", "", "", "", wgs84)

arcpy.management.AddField(spoke_feature_class, key_field, "TEXT")

arcpy.management.AddField(spoke_feature_class, geocoder_field, "TEXT")

arcpy.management.AddField(spoke_feature_class, distance_field, "FLOAT")

spoke_fields = ["SHAPE@", key_field, geocoder_field, distance_field]

spoke_cursor = arcpy.da.InsertCursor(spoke_feature_class, spoke_fields)


# Create a cursor to loop through all hub points

hub_fields = ["SHAPE@", key_field]

hub_cursor = arcpy.da.SearchCursor(hub_feature_class, hub_fields)

for hub in hub_cursor:

    # Loop through all comparison feature classes

    for search_name, search_key in search_feature_classes.items():

        search_fields = ["SHAPE@", search_key]

        search_cursor = arcpy.da.SearchCursor(search_name, search_fields)

        for search in search_cursor:

            # Only compare points geocoded to the same address
            if (hub[1] != search[1]) or (hub[0] == None) or (search[0] == None):
                continue

            # Create spoke line

            segment = arcpy.Polyline(arcpy.Array([hub[0].centroid, search[0].centroid]), wgs84)

            distance = segment.getLength("GEODESIC", "METERS")

            print(search_name, search[1], distance)

            spoke_cursor.insertRow([segment, hub[1], search_name, distance])

        del search_cursor

del hub_cursor

del spoke_cursor
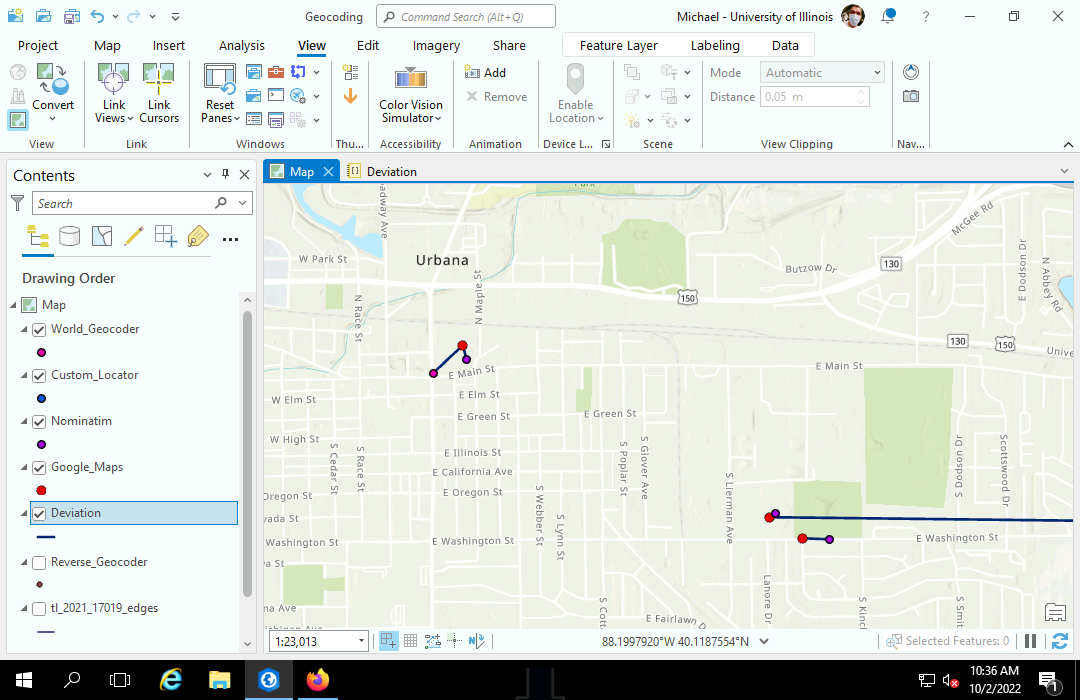
Pivot Tables
The statistical modules NumPy and Pandas can be used to create descriptive statistics for the deviation distances.
import numpy as np
import pandas as pd

# Convert the feature class attributes to a Pandas data frame

column_names = [x.name for x in arcpy.ListFields(spoke_feature_class)]

distances = arcpy.da.FeatureClassToNumPyArray(spoke_feature_class, "*")

distances = [list(x) for x in distances]

distances = pd.DataFrame(distances, columns=column_names)


# Display pivot tables

print("\nMax")

print(pd.pivot_table(distances, values=distance_field,
                     index=[geocoder_field],
                     aggfunc=np.max))

print("\nMedian")

print(pd.pivot_table(distances, values=distance_field,
                     index=[geocoder_field],
                     aggfunc=np.median))

print("\nMin")

print(pd.pivot_table(distances, values=distance_field,
                     index=[geocoder_field],
                     aggfunc=np.min))

print("\nMatches")

print(pd.pivot_table(distances, values=distance_field,
                     index=[geocoder_field],
                     aggfunc=np.count_nonzero))
The output shows the maximum, median, and minimum deviations for each of the geocoders compared to the manually geocoded Google Maps points. It also shows the percentage of addresses that each geocoder matched to some location (match rate).
These four statistics can be used to assess the quality of the geocoders in a particular geographic area. Ideally the "best" geocoder would have highest match rate and lowest deviations in all three categories. However, if there are different rankings in the different categories, your evaluation of quality will be dependent on your needs, such as an application using a large number of addresses for large physical buildings where getting the most number of points geocoded (match rate) would probably take precedence over pinpoint accuracy.
The output shows that the custom street address locator had the lowest maximum and median deviation compared to Google Maps, but it also had the worst match rate (5 of 9 = 56%) compared to the services. This might make it the best geocoder where accuracy is more important than full coverage.
Max
                   Distance
Geocoder
Custom_Locator   108.147087
Nominatim       3989.762695
World_Geocoder  4921.140137

Median
                 Distance
Geocoder
Custom_Locator  60.280296
Nominatim       70.182304
World_Geocoder  64.972946

Min
                 Distance
Geocoder
Custom_Locator  23.634283
Nominatim       17.633583
World_Geocoder  24.911308

Matches
                Distance
Geocoder
Custom_Locator         5
Nominatim              9
World_Geocoder         9