Georeferencing and Digitizing Map Images in ArcGIS Pro
Rev. 23 August 2025
Geospatial data is often acquired from imagery that is remotely sensed by airplanes and space satellites. The process of measuring and interpreting images to extract geospatial data is called photogrammetry.
While there are a growing variety of techniques and software packages that can perform photogrammetry to partially automate the capture of two-dimensional and three-dimensional features from images with minimal direct intervention, there are still often occasions where you may need to manually digitize vector features based on contemporary remotely sensed raster imagery or historic paper maps. You can then symbolize these features according to your mapping needs.
This tutorial covers the basic steps for georeferencing and digitizing from photographic or map images in ArcGIS Pro.
- Acquire the Image
- Georeference the Image
- Publish the Image
- Digitize the Features
- Publish the Features
- Save a Project Package
Acquire the Image
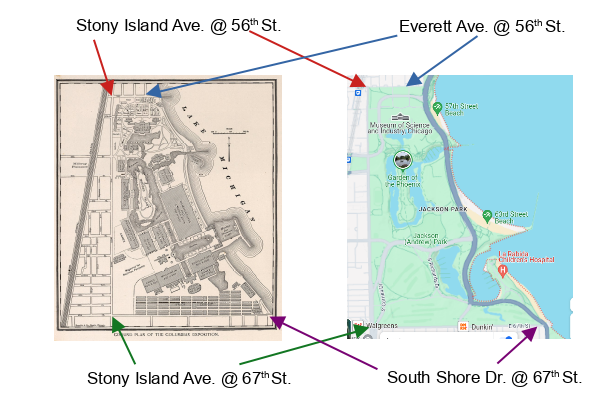
The example image is a historic map of the 1893 Columbian Exposition, commonly referred to as the 1893 Chicago World's Fair. The map was created by cartographer George Cram and published in a commemorative atlas of the fair.
This image was downloaded from the David Rumsey Map Collection. The video below shows how to downlad and unzip a map from that collection.
Other sources for historical map imagery include:
- The Library of Congress Sanborn Map Collection
- The Big10 Geoportal
- Many state historical societies have digital collections and you can Google name_of_state historical society to find those sites.
If your map contains a border and/or marginalia that you do not want in your map, open the image in Paint and crop to show only the desired area.
Georeference the Image
While human eyes can interpret a map image, most image files do not contain enough information for software to be able to figure out where the image is located on the surface of the earth and map it accordingly.
Using an image as a map layer in ArcGIS Pro requires a step called georeferencing where locations on the map called control points are marked as located at specific latitudes and longitudes, and the software stretches (transforms) the image to align the control points with locations on the ground.
Note that georeferencing is different from geocoding, which is the process of converting addresses into latitudes and longitudes.
Plan the Control Points
Your first step in georeferencing should be to plan where your control points will be located. Your choices will be affected by:
- The level of detail available in the map image
- The accuracy of the original map
- How drastically conditions on the ground have changed since the map was created. This can be especially important when digitizing environmental features (like rivers) that have ambiguous and constantly changing borders.
When georeferencing high-accuracy maps of urban areas, four control points at street intersections at the four corners of the mapped area are often adequate for accurate georeferencing. While street names change and streets are sometimes moved or removed, street grids commonly stay stable over time.
For this example map of the fair grounds, the four corners are below. Because the avenue names are not clearly marked on the map, they are inferred by counting existing streets.
Georeferencing Tool
- Create a project with a new map.
- Zoom into the approximate area where the image or map is supposed to be located.
- Under Analysis, Tools open the Raster to Geodatabase tool to copy the image raster into the project geodatabase.
- Under View, Catalog Pane, Databases, drag the raster from the project geodatabase onto the map. Note that if the raster does not appear in the project geodatabase, you may need to Refresh the database list or restart Pro completely.
- The image will appear in the Contents pane, but will not be visible in the correct location because ArcGIS Pro doesn't have clear information on where it is supposed to be located.
- Select the image layer in the Contents pane, select the Imagery tab, and click Georeference.
- Click the Fit To Display button. The map image should appear in the center of the screen, although it will not be correctly aligned with the base map.
- In the Georeference tab and under Transformation, select Projective. This tells ArcGIS Pro how to stretch the map, and a projective transformation often works well with historic maps that are already projected.
- In the Raster Layer tab, select Rendering, Resampling Type, Cubic so the image is smoother when zoomed in.
- Select Add Control Points and add control points by selecting a location on the image first, then select the matching location on the base map.
- Try to match locations at your four planned corners first.
- Zoom in as close as possible so your control points are as accurate as possible.
- When trying to align street intersections, aim for the centers of the intersections.
- Look around the map to make sure things align as expected. Add additional points as needed to align the map as closely as possible to the base map.
- If you make a mistake the controls on the Georeferencing tab in the Review section can be used to select, move, or delete control points.
- When you are done and feel your image is well aligned with the base map, click Save to save the changes to the image.
- On the Georeference ribbon, click Save and Close Georeference to finish georeferencing.
Publish the Image
The image georeferenced above is kept in the project geodatabase on your local machine.
- If you are only planning on using the image within one project, you can create maps using the image directly from the project geodatabase. The database will be stored in your project package when you save that package.
- If you want to want to share these materials with colleagues or use them in web maps, you need to publish the map image as a tile service.
- If you publish to ArcGIS Online, the data behind the service is stored in a geodatabase in the cloud which can be accessed over the internet using the tile service.

Tile Service
The georeferenced map image is a raster so it can be published as a tile service, which breaks the images into 256 x 256 map tiles that the browser or mobile map app stitches together into a complete image for the viewer. This is a technique used by Google Maps and most other web portals when creating web maps of imagery.
- Right-click on the image in the Contents pane and
select Sharing -> Share as Web Layer.
- Give the service a meaningful name.
- Add meaningful content to the Summary.
- Layer Type is Tile.
- Share with Everyone.
- Under the Configuration tab, make sure the Tiling Scheme is ArcGIS Online / Bing Maps / Google Maps. This will publish the tiles in a web Mercator projection that can be used on web maps.
- When the tool completes, go into ArcGIS Online and view the information page for the tile service.
- Check the Settings tab and Show current tile details. ArcGIS Online may need to wait a few minutes for ArcGIS Online to build your tiles depending on how large your map is.
- Back on the Overview page, create a new web map with Open in Map Viewer.
- Check to make sure the layer aligns appropriately.
- Save the map with a meaningful name.
- Share map with the desired level of sharing.
Tile Zoom Level
ArcGIS Pro publishes the tile layer with an estimate of the desired zoom levels that will be needed. With this image, the tiles are published between zoom levels 14 and 17.
- If you wish zoom into the web map to see a greater level of detail and the layer disappears, you will need republish the layer
- Delete the prior tile layer and service definition.
- Republish the layer adjusting the level of detail to a closer zoom level. In this example, the maximum zoom is incresed from 17 to 18. The appropriate level for your image may vary depending on the amount of area covered and the desired level of detail.
- View the layer settings in ArcGIS Online to confirm tiles have been built at all levels. This may take a few minutes depending on the number of tiles needed.
- You may need to log out of ArcGIS Online and log back in so the browser reloads the feature service with the higher resolution titles.
- Higher resolution tiles consume more server space and require longer to fully publish. You should only provide tiles at a maximum zoom level useful to most of your users with a specific raster image.
- There is an option in ArcGIS Online to Build Tiles at different ranges of zoom levels, but this may fail with an cryptic error message Error building tiles.
Tile Publishing Errors
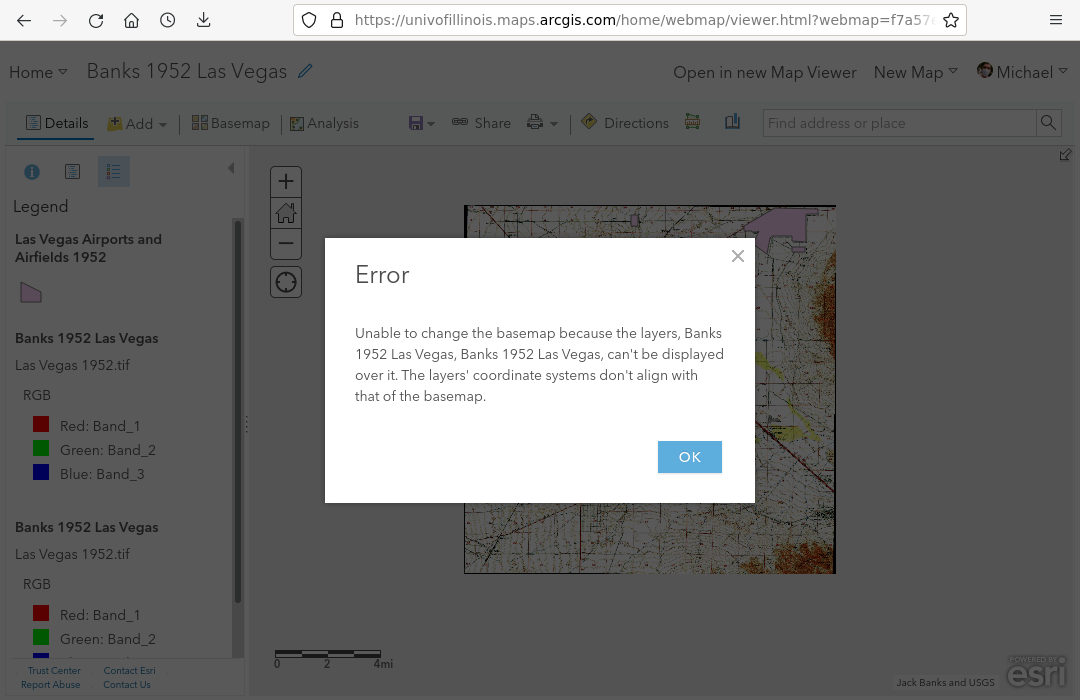
If you create a web map with your tile layer and receive a layer alignment error when you try to add a base map, you have probably created a tile service in a projection other than the web Mercator projection used on most web maps.
- Go back into ArcGIS Pro and recreate the tile service.
- Under the Configuration tab, make sure the Tiling Scheme is ArcGIS Online / Bing Maps / Google Maps.
Swipe Map
You can use ArcGIS Experience Builder to create a web app that allows you to swipe the layer and compare the present to the past.
- On your ArcGIS Online Content page, select Create app, Experience Builder, and Create new.
- Use a Blank fullscreen template.
- Give the app a meaningful name.
- Select the Page, turn on the Header and edit the header text.
- Drag a Map widget onto the canvas.
- Under Style, configure the widget to fill 100% of the canvas.
- Under Content, Select map, Add new data and select the web map you created above.
- Drag a Swipe widget onto the canvas.
- Select a template (Simple) and Start.
- Select a Map widget with the map.
- Style the Width (40%) and Height (25%).
- Snap to bottom and Snap to right.
- Customize settings to Select leading layers with the map image tile layer.
- Switch to Live View and turn on the swipe widget to preview.
- Save and Publish the app.
- Copy published item link to get a link to share.
Digitizing Features
Although georeferencing creates an image that you can map directly, it does not capture individual features on the map. If you want to change the styling of your features or define attributes for features, you need to digitize the features into a feature class. While software and techniques exist to partially automate this process with high-resolution aerial photographs, historic aerial images and maps like these usually need to be traced manually.
Create a New Feature Class
Feature class is a term used by ESRI for "a collection of geographic features that share the same geometry type (such as point, line, or polygon) and the same attribute fields for a common area" (ESRI 2021). When you load a shapefile or CSV file into a map, or add a layer of features from a feature service, you are using a feature class.
- On the View tab, view the Catalog Pane.
- Under Databases, right-click on the database for the project, and select New -> Feature Class.
- Give the new feature class a meaningful Name. The name can only contain letters and numbers, but you can give a more readable name in the Alias if desired.
- Specify the Feature Class Type based on
whether points, lines, or polygons
are the best choice for representing the features.
- Each feature class can have only one type of feature, although you can, of course, create multiple feature classes, such as a polygon feature class for buildings and a line feature class for roads.
- For this example, we will create a polygon feature class to represent buildings, some of which still exist in some form, like the American Museum of Natural History.
- In creating the new feature class, you need to determine
what Fields (attributes) you want to associate with each feature.
- For buildings, such attributes could include things like name, address, height (floors), owner, purpose, etc.
- In this case, all the map provides is the name, so that will be our only attribute.
- Qualitative attributes like names or addresses should be a Text type. Quantitative attributes like height or square feet should be either Long Integer if there are no decimal points or Double if there are decimal points.
Trace the Features
Once the feature class has been created, you can start tracing the features.
- If the image you are digitizing is pixillated (blocky) and hard to read, you can make it a little more readable by selecting the layer in the Contents pane and under Appearance changing the Resampling Type to Bilinear.
- Select the new feature class in the Contents pane and on the Edit tab, click Features, Create.
- The Create Features pane will pop up and you can select
different types of drawing tools.
- The Polygon tool is the most common with irregular areas. Click to add vertex points and then double-click on the last point to stop.
- The rectangle tool is easiest with rectangles.
- If you need to better align your polygon vertices, click Features, Modify, Select the feature, right-click and select Edit Vertices.
- To modify the attributes of a feature, Select the feature, and right-click to edit Attributes, change the attributes as needed, and click Apply.
- When you are done tracing, on the Edit tab, click Manage Edits -> Save.
Publish the Features
The digitized vector features can be shared by publishing to a feature service.
- Right click on the layer in Contents and select Sharing and Share as Web Layer.
- Provide a meaningful name.
- Provide a summary
- Share with Everyone.
- Analyze to make sure everything is OK.
- If you get an error that, Unique numeric IDs are not assigned, click on the ellipsis (...) on the message and select Auto-Assign IDs Sequentially.
- After the layer is published, you should be able to add the layer to a map in ArcGIS Online.
Feature Publishing Errors
If you are editing the metadata and get a warning that, "The layer is accessing the data source's metadata..."
- Select View -> Catalog Pane.
- Find the new feature class under the Databases.
- Right-click on the feature class, and select Edit Metadata there.
If you get a warning that "Field xxx is not supported as a display field"
- Right-click the layer in the Contents pane and click Properties.
- Click the Display options and choose a field for Display field other than the length or area field.
- Click OK to apply your changes.
If you get a warning that, "Allow assignment of unique numeric IDs for sharing web layers is disabled in Map Properties"
- Right click on the Map in the Contents pane.
- On the General tab, check Allow assignment of unique numeric IDs for sharing web layers.
- Click OK to apply your changes.
If you get " Error 00241 Field Shape_Length cannot be used as a display field"
- Right click on the layer, view the Properties, go to the Display pane.
- Select a Display Field that is one of the layer attributes rather than one of the feature information fields (like Shape_Length) that is only meaningful in ArcGIS Pro.
- The Display Field is used as the default when labeling is turned on.
Save A Project Package
You should save your project as a project package to ArcGIS Online so you can open the project on another machine, and so you have a backup.
- Go to the Share tab and select Project.
- Provide a name to save the project under. The default is the name of the current project.
- Copy the name into the Tags and Summary fields.
- Click the Share outside of organization box so your project database containing your layers is included in your project package.
- Unclick the Include Toolboxes and Include History Items check boxes so that history or toolbox errors to not cause your upload to fail.
- Analyze the project to find any problems.
- Package the project to upload it to ArcGIS Online.